Table of contents
- Choose a VPN service for your Mac
- How VPNs Enhance Security and Privacy
- Connecting your Mac to a VPN
- How to download a VPN for your Mac
- How to share your VPN over Wi-Fi on Mac
- Troubleshooting Common VPN Setup Issues on Mac
- Set up a VPN on Mac to enhance security and privacy
Choose a VPN service for your Mac
A VPN remains one of the best ways to protect your data from being viewed or stolen by hackers. It adds an essential layer of security and privacy to your online presence. In 2025, with increasing digital threats, using a VPN is crucial for safeguarding personal information.
Some of the main reasons to install a VPN on your Mac are:
- Remote Work: Create a secure environment for accessing work networks outside the office.
- Anonymous Browsing: Secure your web traffic on public Wi-Fi connections.
- Bypass Geo-blocking: Access sites restricted in your home country, unlocking global content.
Beyond these, VPNs can:
- Reduce buffering while streaming content.
- Help save money when booking flights, hotels, and car rentals by bypassing regional pricing differences.
- Allow you to access your home network while you're away.
- Improve download speeds by reducing throttling.
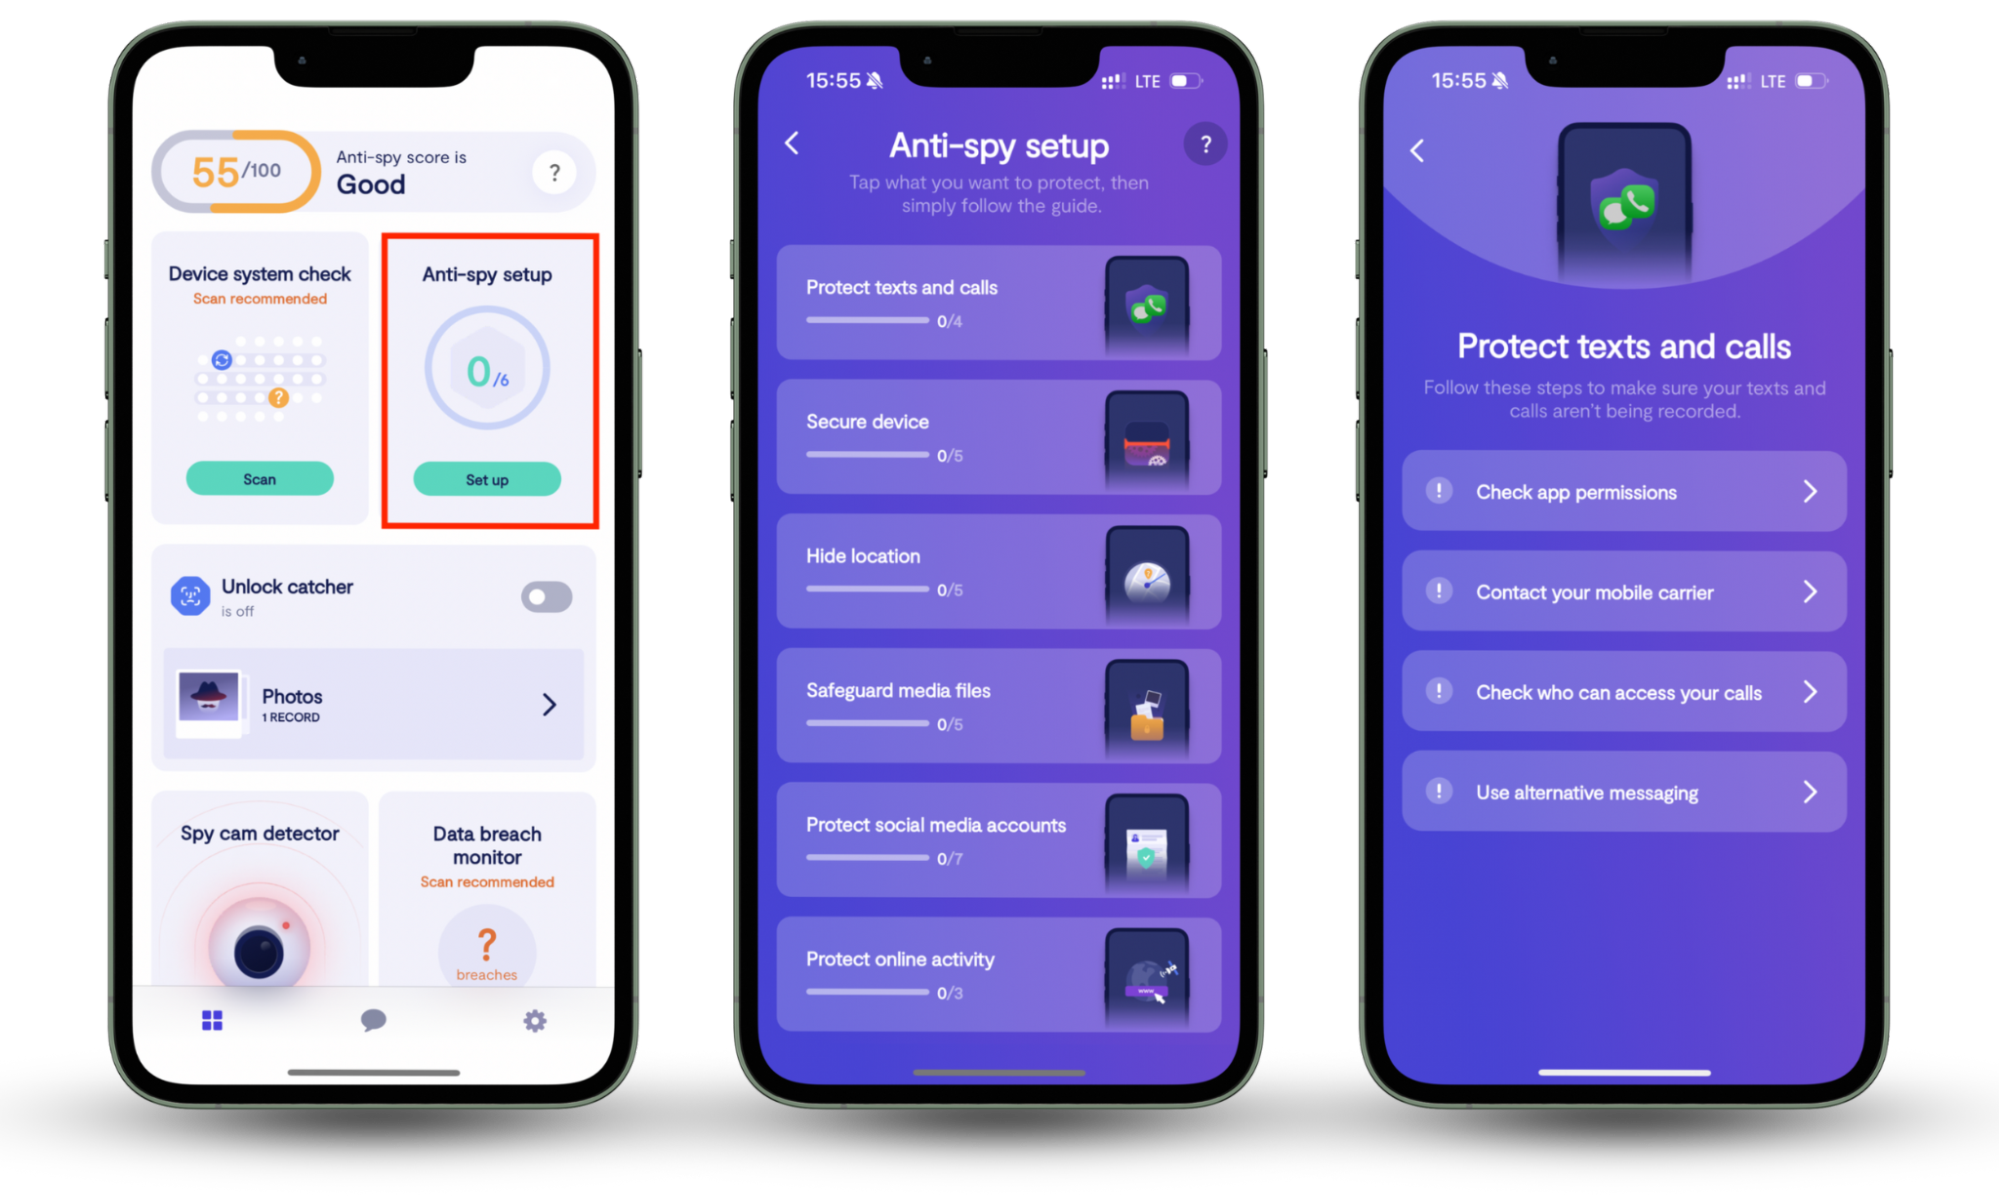
However, VPNs are just one tool in the privacy toolkit. For mobile phone users, Clario Anti Spy's Anti-spy setup tool is an excellent alternative. This tool provides easy-to-follow checklists that help prevent spying and breaches on your phone. It ensures that you can enjoy peace of mind while making calls, browsing social media, and going about your daily tasks without worrying about your privacy being compromised.
However, VPNs are one of several tools that privacy-minded users can benefit from. An alternative is Clario Anti Spy’s Anti-spy setup tool, which provides straightforward checklists to help you prevent spying and breaches on your mobile phone. After all, you should be able to call loved ones, use social media, and perform daily tasks without looking over your shoulder.
Here’s how to use your phone peacefully with Clario Anti Spy’s Anti-spy setup tool:
- Download Clario Anti Spy, get a subscription, and set up an account.
- Navigate to the Anti-spy setup section and choose the Set up option.
- Here, you’ll find several checklists organized into the relevant categories. Go through the list and implement all the items on the checklists to keep your data safe.

Pro tip
For a truly secure online experience, combine your VPN with anti-spyware software like Clario Anti Spy. This will help protect your devices from a broader range of threats, both online and offline.
How VPNs Enhance Security and Privacy
A VPN ensures your online activities are protected by masking your IP address and encrypting your internet traffic. This makes it much harder for hackers, trackers, or even your ISP to monitor your online behavior.
However, a VPN alone can't protect you from spyware, malware, or device-specific vulnerabilities. That's where Clario Anti Spy comes in, adding an extra layer of defense by preventing data leaks through malicious apps.
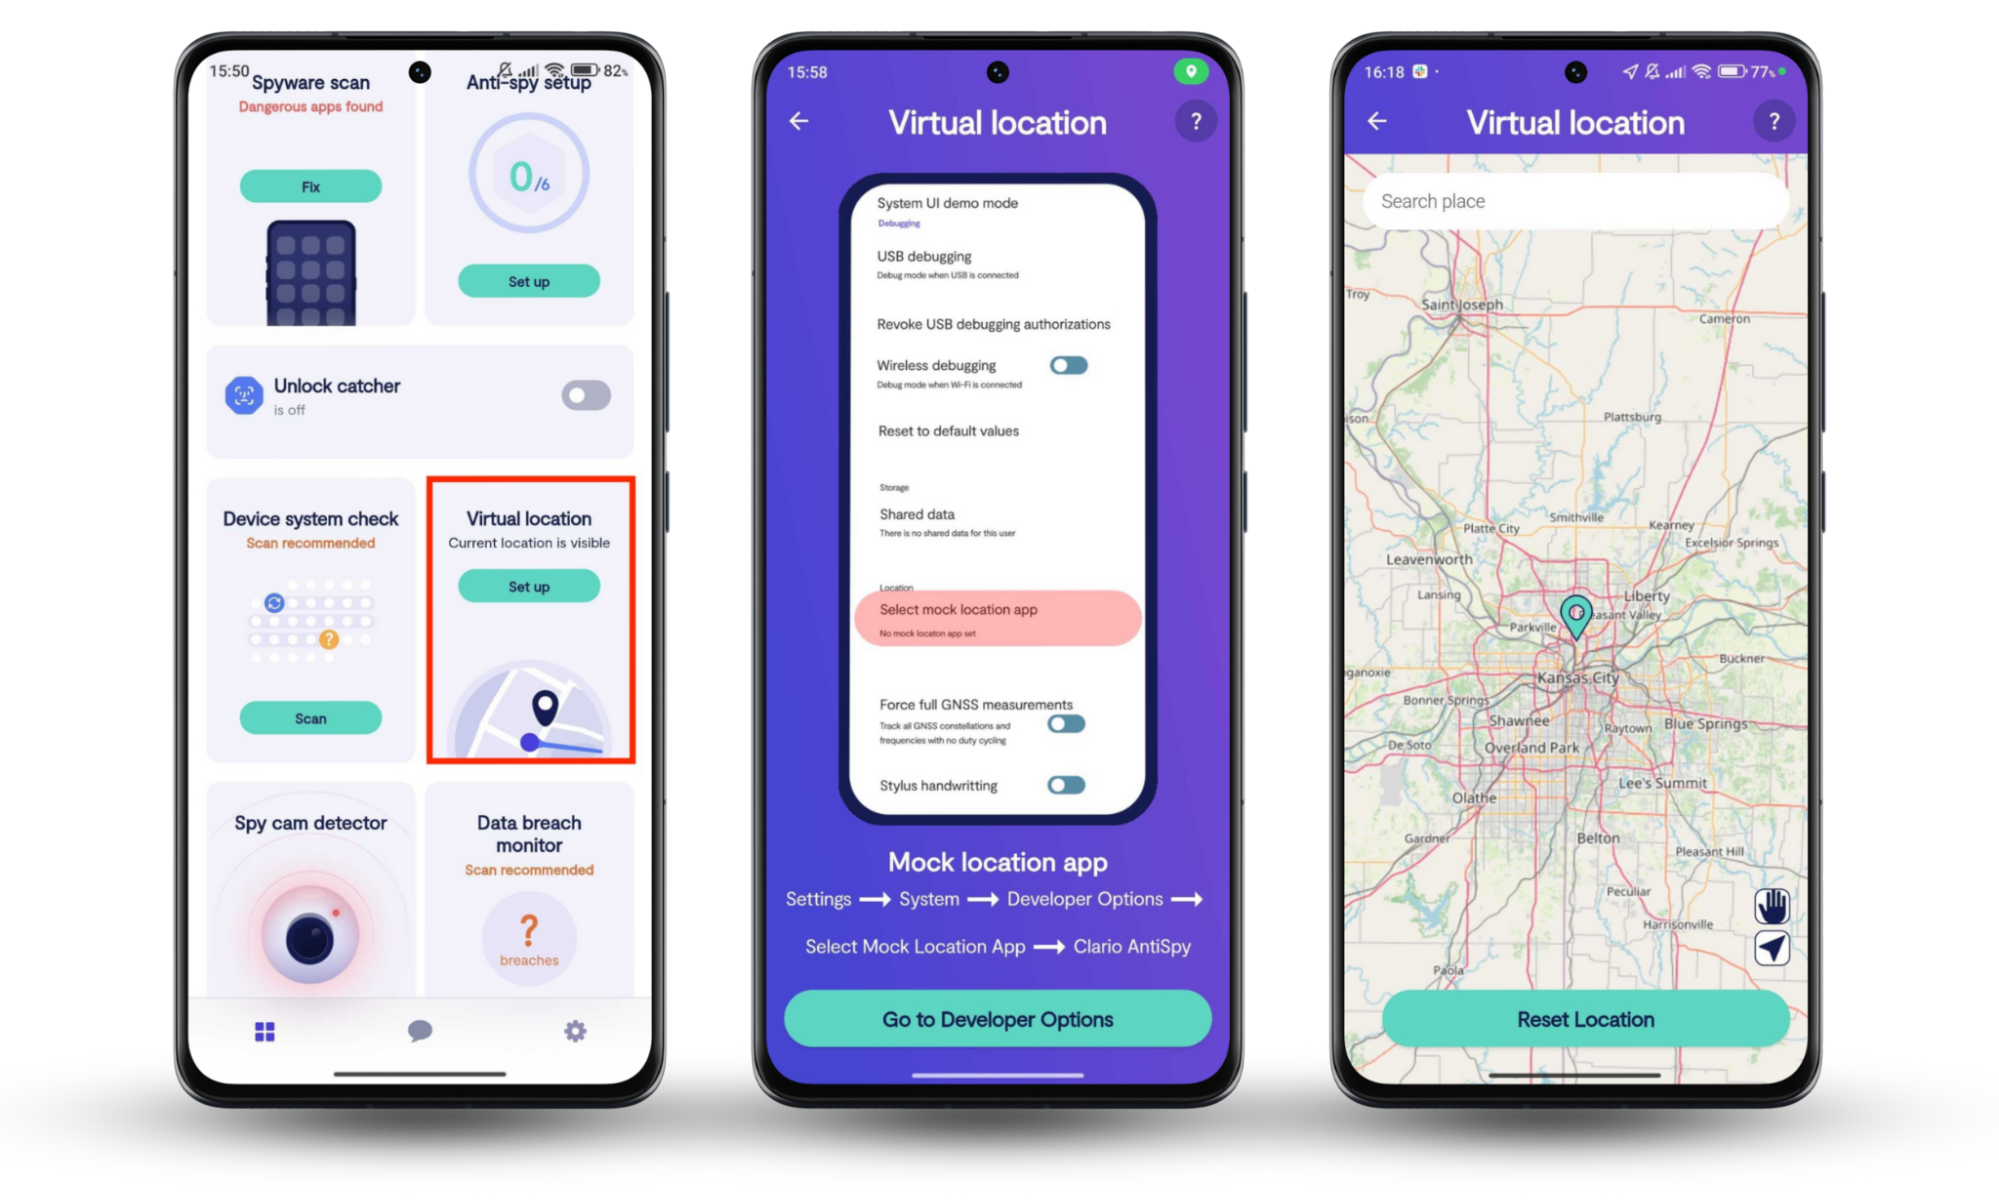
One of the unique features of Clario Anti Spy is Virtual location, which acts as an alternative solution for privacy-conscious users. This tool allows you to mask your physical location, preventing geo-targeted ads and tracking, which is not something a VPN alone can offer. With Clario Anti Spy, you can safeguard your personal information beyond the typical VPN protection.
A great example of how Clario Anti Spy enhances privacy comes from one of our customers who was struggling with online tracking and suspicious activity on her Android phone. She reached out to our customer support team, and our agent guided her through the process of using the Virtual location feature. By activating this tool she was able to change her phone’s location to another country, effectively masking her real location and preventing geo-targeted ads and tracking. With Clario Anti Spy, she was able to browse, make calls, and use social media without feeling like her every move was being watched.
How to Use Virtual location on Clario Anti Spy:
- Download Clario Anti Spy on your Android device, get a subscription, and set up your account.
- Once you’re inside the app, tap Set up under Virtual location.
- Now follow the on-screen prompts to reset your location, choosing your preferred one on the map.

Connecting your Mac to a VPN
To connect your Mac to a VPN, you have two options: use third-party VPN software or Apple’s built-in VPN client. Below are the detailed instructions for both methods.
We’ve got you covered below with everything you need to know about how to set up and use a VPN on your Mac. Then, we’ll go over how you can configure VPN access on your iPhone or iPad too.
How to download a VPN for your Mac
Before you can connect to a VPN, you’ll need to sign up for a VPN service. Most VPN providers offer user-friendly apps with monthly or annual subscriptions. Once you’re done and dusted on that front, you can go ahead with one of the two options below:
Option 1: Connect with your VPN’s software
So, you've purchased your new VPN subscription. Now, you're sitting in front of your screen, wondering what to do next. Luckily, opening your VPN on your Mac is a fairly easy process – most VPN providers offer custom VPN software that’s a breeze to install, launch and use on your MacBook, iPhone or iPad.
- Download and Install the App: Most VPN providers offer custom software that is easy to install. Simply follow the on-screen instructions.
- Sign In: Enter your login credentials.
- Allow VPN Configuration: The app will ask for permission to modify your network settings, click "Allow" to proceed.
- Connect: Once connected, you can start using the VPN immediately.
The process works similarly for other iOS devices, so long as you’ve installed the relevant app. You just need to:
- Open the app and sign in.
- Give permission to add the VPN to your device by tapping Allow.
- Enter your passcode or use TouchID/Face ID to give permission to change your VPN settings.
While it's generally easier to use a dedicated VPN software, you can configure a VPN manually on your MacBook by diving deeper into your Mac’s settings.
Option 2: Use Apple’s built-in VPN tools
If your VPN provider doesn't offer dedicated software, you can manually set up your VPN connection using macOS’s built-in tools.
- Go to the Apple Menu and select System Settings (or System Preferences in older macOS versions).
- Click Network, then select the + symbol to add a new connection.
- Choose your VPN type from the dropdown menu (IPSec, IKEv2, L2TP).
- Enter your VPN provider’s server address and account information.
- Click on Authentication Settings, and enter the encryption details provided by your VPN.
- After entering the details, click Apply to save.
- Check the option Send all traffic over VPN connection under Advanced settings and click OK.
- To easily toggle your VPN, check the box for Show VPN status in the menu bar.
Option 3: How to import VPN settings on Mac
If your work network administrator provides a VPN configuration file, you can easily import it to set up your VPN connection on a Mac. Follow these steps:
Automatic Setup:
- Double-click the received VPN configuration file to open Network Preferences.
- The settings will automatically be imported and configured for you.
Manual Setup:
- Go to the Apple menu and select System Settings (or System Preferences in older macOS versions).
- Open Network and click on the Action pop-up menu.
- Choose Import Configurations and select the received file.
- Click Import to add the settings.
Note
Manually configuring your Mac VPN gives you more flexibility, allowing you to select different servers and protocols. However, you may need to input your settings each time you change the server, which can be less convenient than using dedicated VPN software.
How to share your VPN over Wi-Fi on Mac
Once you're connected to a VPN, you might want to share that connection with other devices. Here's how you can share your VPN connection over Wi-Fi:
You just need to go through the following steps:
- Go to System Settings (or System Preferences in older macOS versions), then click on the Sharing option under Internet & Wireless.
- Choose the Internet Sharing option on the left-hand side of the screen.
- Choose your VPN connection from the Share your connection dropdown menu.
- Next, check the box for Wi-Fi under To computers using. At this point, you can go to Wi-Fi Options to set up the password for the Wi-Fi network. Choose a network name, leave the channel selection as the default, and create and re-enter your password.
- Enter the password you created to connect your other Apple devices to your VPN.
- Enable Internet Sharing by pressing Start. You should see a green light pop up. This is your cue that Internet Sharing has been properly activated.
- At this point, you can look for Wi-Fi networks on your iPhone or iPad and connect to the VPN hotspot you’ve set up.
Troubleshooting Common VPN Setup Issues on Mac
VPN setup can sometimes present challenges. Here are some common issues and how to fix them:
| Issue | Solution |
| VPN connection drops frequently. | Check your VPN’s server load, choose a less crowded server, or ensure your macOS is up to date. |
| VPN connection fails after switching networks. | Enable Reconnect automatically in your VPN settings. |
| VPN is slow. | Switch to a different server, or enable faster protocols like IKEv2 or WireGuard, if available. |
Set up a VPN on Mac to enhance security and privacy
VPNs are an essential tool for securing your online presence, especially when using your Mac. Whether you opt for third-party software or configure the VPN manually, the steps outlined above will help you get set up. To enhance your privacy and security, consider using Clario Anti Spy's Virtual location to complement your VPN.


