Table of contents
- BSOD meaning
- Blue screen of death causes
- 1. Corrupt drivers
- 2. Overheating
- 3. Weak or malfunctioning hardware
- 4. Malware
- 5. System file issues
- 6. Power supply issue
- 7. Misconfigured BIOS
- 8. Insufficient space on the system disk
- 9. Outdated Windows
- How to fix the blue screen on Windows 10 and 11
- 1. Turn off your PC
- 2. Unplug all external USB devices except for the mouse and keyboard
- 3. Restart Windows in Safe Mode with Networking
- 4. Uninstall recently installed software
- 5. Roll back drivers
- 6. Scan for malware
- 7. Run an SFC Scan
- 8. Scan your PC with CHKDSK
- 9. Check RAM using the Windows Memory Diagnostic tool
- 10. Check if the BSOD shows again after the reboot
- 11. Reinstall Windows
- 12. Upgrade hardware
- How to protect your PC from the blue screen of death
- 1. Create backups for important files
- 2. Keep your PC up to date
- 3. Protect yourself with antivirus software
- 4. Install automatic cleaning for your PC
- Conclusion
BSOD meaning
BSOD definition
BSOD stands for the blue screen of death. The Windows blue screen of death is a blue error screen that pops up when your personal computer (PC) suddenly crashes due to a fatal system error. It typically signifies that your PC is in critical condition, so the system stops operating.
To put it technically, the BSOD is a system failure at the kernel level, brought about by software or hardware issues. That means it’s more severe than an app crash. While an app crash can stop you in your tracks, it typically only affects an app instead of crashing your whole PC. However, the blue screen of "death" causes your computer to die and lose unsaved data. This is to protect your laptop from damage. Fortunately, this isn’t a permanent state, and neither will it kill you, so you shouldn’t be alarmed.
As of Windows 10, the blue screen of death includes a description of the error, which you can look up on Windows Support. The warning message is white and reads, “Your PC ran into a problem and needs to restart. We’re just collecting some error info, and then we’ll restart for you,” and includes a sad-face emoji. Sometimes, you’ll also see a QR code on the BSOD on your Windows 10 or 11 blue screen, which you can scan for more details.
Blue screen of death causes
Causes of the blue screen:
- Corrupt drivers
- Overheating
- Weak or malfunctioning hardware
- Malware
- System files issues
- Power supply issue
- Misconfigured BIOS
- Insufficient space on the system disk
- Outdated Windows
There are several reasons why you’re experiencing the dreaded blue screen of death. Read the detailed list of BSOD causes below to understand why you’re experiencing this error. Keep in mind, though, that your PC will notify you of the specific cause of the Windows error code.
1. Corrupt drivers
Corrupt drivers are the main cause of the blue screen of death. According to a Microsoft resource page, 70% of BSODs are caused by third-party driver code. Computer drivers are files that help a computer function by serving as the middlemen between its hardware and software. When they’re corrupt, broken, or outdated, this can cause your PC to show the blue screen of death. To combat this, you must keep your system updated through the relevant source, like Windows Update.
2. Overheating
Your PC overheats for various reasons, including dust accumulation, overburdened hardware, and a defective fan. Regardless, overheating can cause a blue screen error. Sometimes, your computer automatically restarts first and then shows the blue screen of death. This is why it’s important to keep your PC cool and dust-free.
3. Weak or malfunctioning hardware
10% of blue screen of “death” errors are caused by hardware issues, according to Microsoft. This happens when your hardware is old, damaged, or not installed properly. Below are examples of such hardware.
- Hard disk drive (HDD)
- Faulty memory (RAM)
- Processor
- Solid-state drive (SSD)
- Motherboard
- Power supply unit (PSU)
4. Malware
The presence of malware on your Mac is a recipe for disaster. Along with compromising your privacy, malware, including computer viruses, can corrupt important files and folders and cause your PC to show a blue screen error.
Did you know?
According to DataProt, 560,000 new pieces of malware are detected every day. This is why installing anti-malware software is a non-negotiable for all computer owners.
A rootkit virus is an example of a dangerous form of malware that can affect your PC.
5. System file issues
Windows system files are key files in the Windows operating system that keep your PC running smoothly. Similar to other files, these files can get corrupted over time. When this happens, your computer can no longer use the files, which can hamper your device’s performance.
Here are the causes of system file issues:
- Computer crashes
- Erroneous software
- Power surges
- Malware
- Problems updating Windows
- Hard disk issues
6. Power supply issue
An unreliable power supply can cause a host of performance issues on your PC. These include overheating, slowing down, crashing, restarting randomly, and the blue screen of death. This happens because when the power supply is defective, it can lead to voltage changes, which can cause your system to crash.
7. Misconfigured BIOS
An outdated, incompatible, or overlocked BIOS can cause your PC to show the blue screen of death, among other issues. BIOS stands for basic input/output system, which is the program that your computer's microprocessor leans on to wake up the computer system after you switch it on. It achieves this by initializing hardware operations and managing the incoming and outgoing data from the operating system.
8. Insufficient space on the system disk
Insufficient disk space can cause your computer to repeatedly show you the BSOD, especially when your C drive is full. Windows 10 requires between 2GB and 10 GB of free disk space to function properly. Running updates and installing new software on your PC can create temporary files that can cause memory overflow, which can bring about errors like INVALID_DATA_ACCESS_TRAP.
9. Outdated Windows
Having an outdated Windows 10 operating system can potentially cause your PC to crash and show you the BSOD. This happens for numerous reasons, including security vulnerabilities not addressed in the older Windows version, software conflicts, and more.
Keeping Windows updated saves you from a host of problems, including bluescreening. This is because Windows updates patch bugs and fix issues on your system, which makes it less likely to experience errors that lead to the BSOD.
How to fix the blue screen on Windows 10 and 11
To fix the BSOD on Windows:
- Turn off your PC
- Unplug all external USB devices except for the mouse and keyboard
- Restart in Safe Mode with Networking
- Uninstall recently installed software
- Roll back drivers
- Scan for malware
- Run an SFC Scan
- Scan your PC with CHKDSK
- Check RAM using Windows Memory Diagnostic
- Check if the BSOD shows again after the reboot
- Reinstall Windows
- Upgrade hardware
Experiencing the blue screen of death can be alarming, but it can be fixed. Follow our in-depth guide below carefully to troubleshoot the BSOD issue you’re facing on your Windows PC.
1. Turn off your PC
To force your Windows 10 or 11 to shut down, press and hold the power button until your PC shuts down. Typically, it’s not ideal to force a shutdown on your PC. However, facing a BSOD is one of the few times when it’s both acceptable and necessary because your PC has crashed anyway.
2. Unplug all external USB devices except for the mouse and keyboard
Hard drives sometimes cause the BSOD to appear on your PC. Therefore, we advise disconnecting them all by unplugging them from your computer to remedy the issue.
3. Restart Windows in Safe Mode with Networking
On Windows 11:
- Switch off your computer by holding down the power button for 10 seconds.
- Switch it on and repeat this process twice more.
- Choose Advanced options and click on Troubleshoot > Advanced options > Startup Settings > Restart.
- Now press F5.
On Windows 10:
- Switch off your computer by holding down the power button for 10 seconds and switch it on again after the logo appears. Repeat this process twice more.
- Click on Troubleshoot > Advanced options > Startup Settings > Restart on the Choose an option screen.
- Your computer will restart. When it does, enter Safe Mode with Networking by either pressing F5 or choosing option 5 from the list.
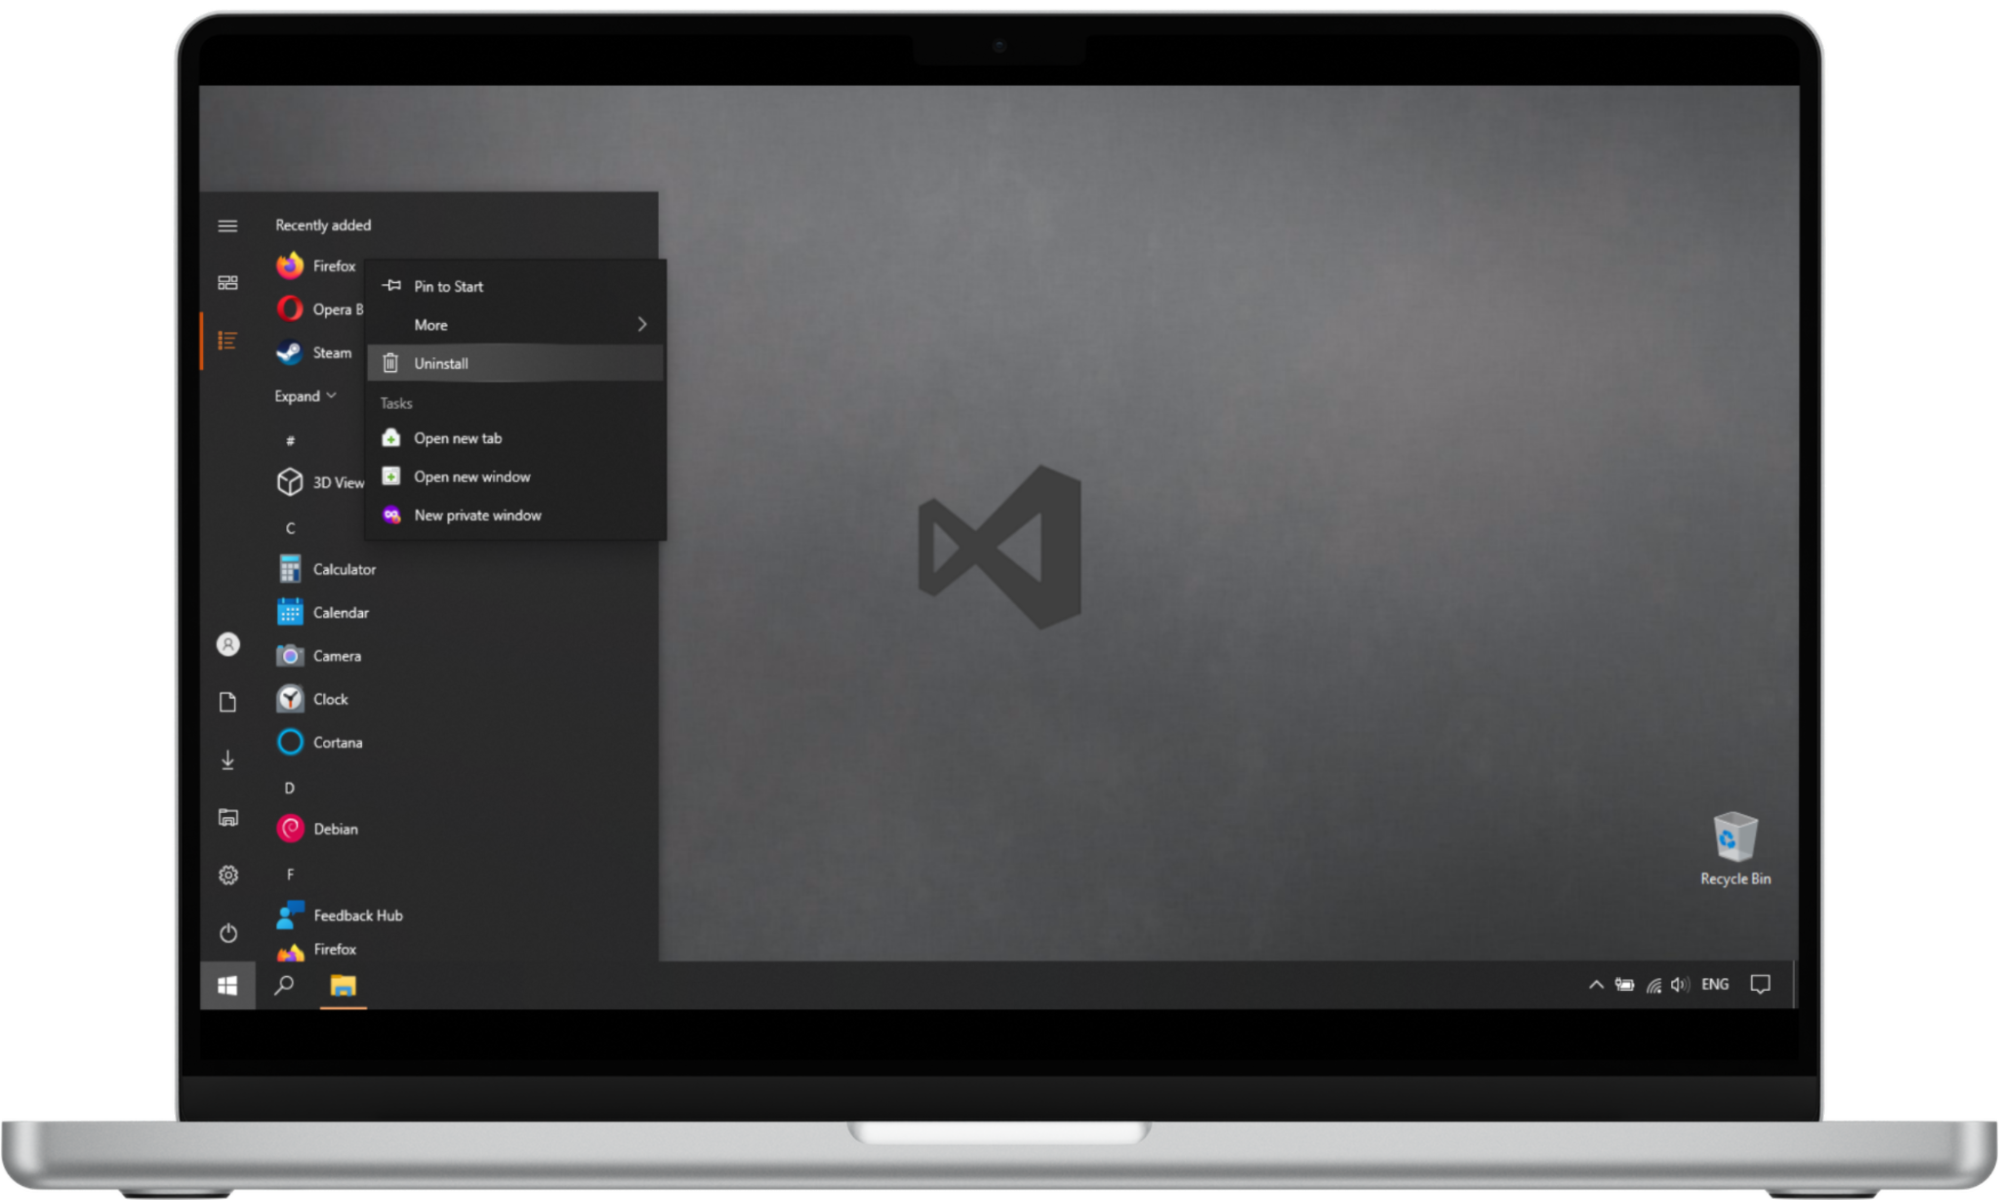
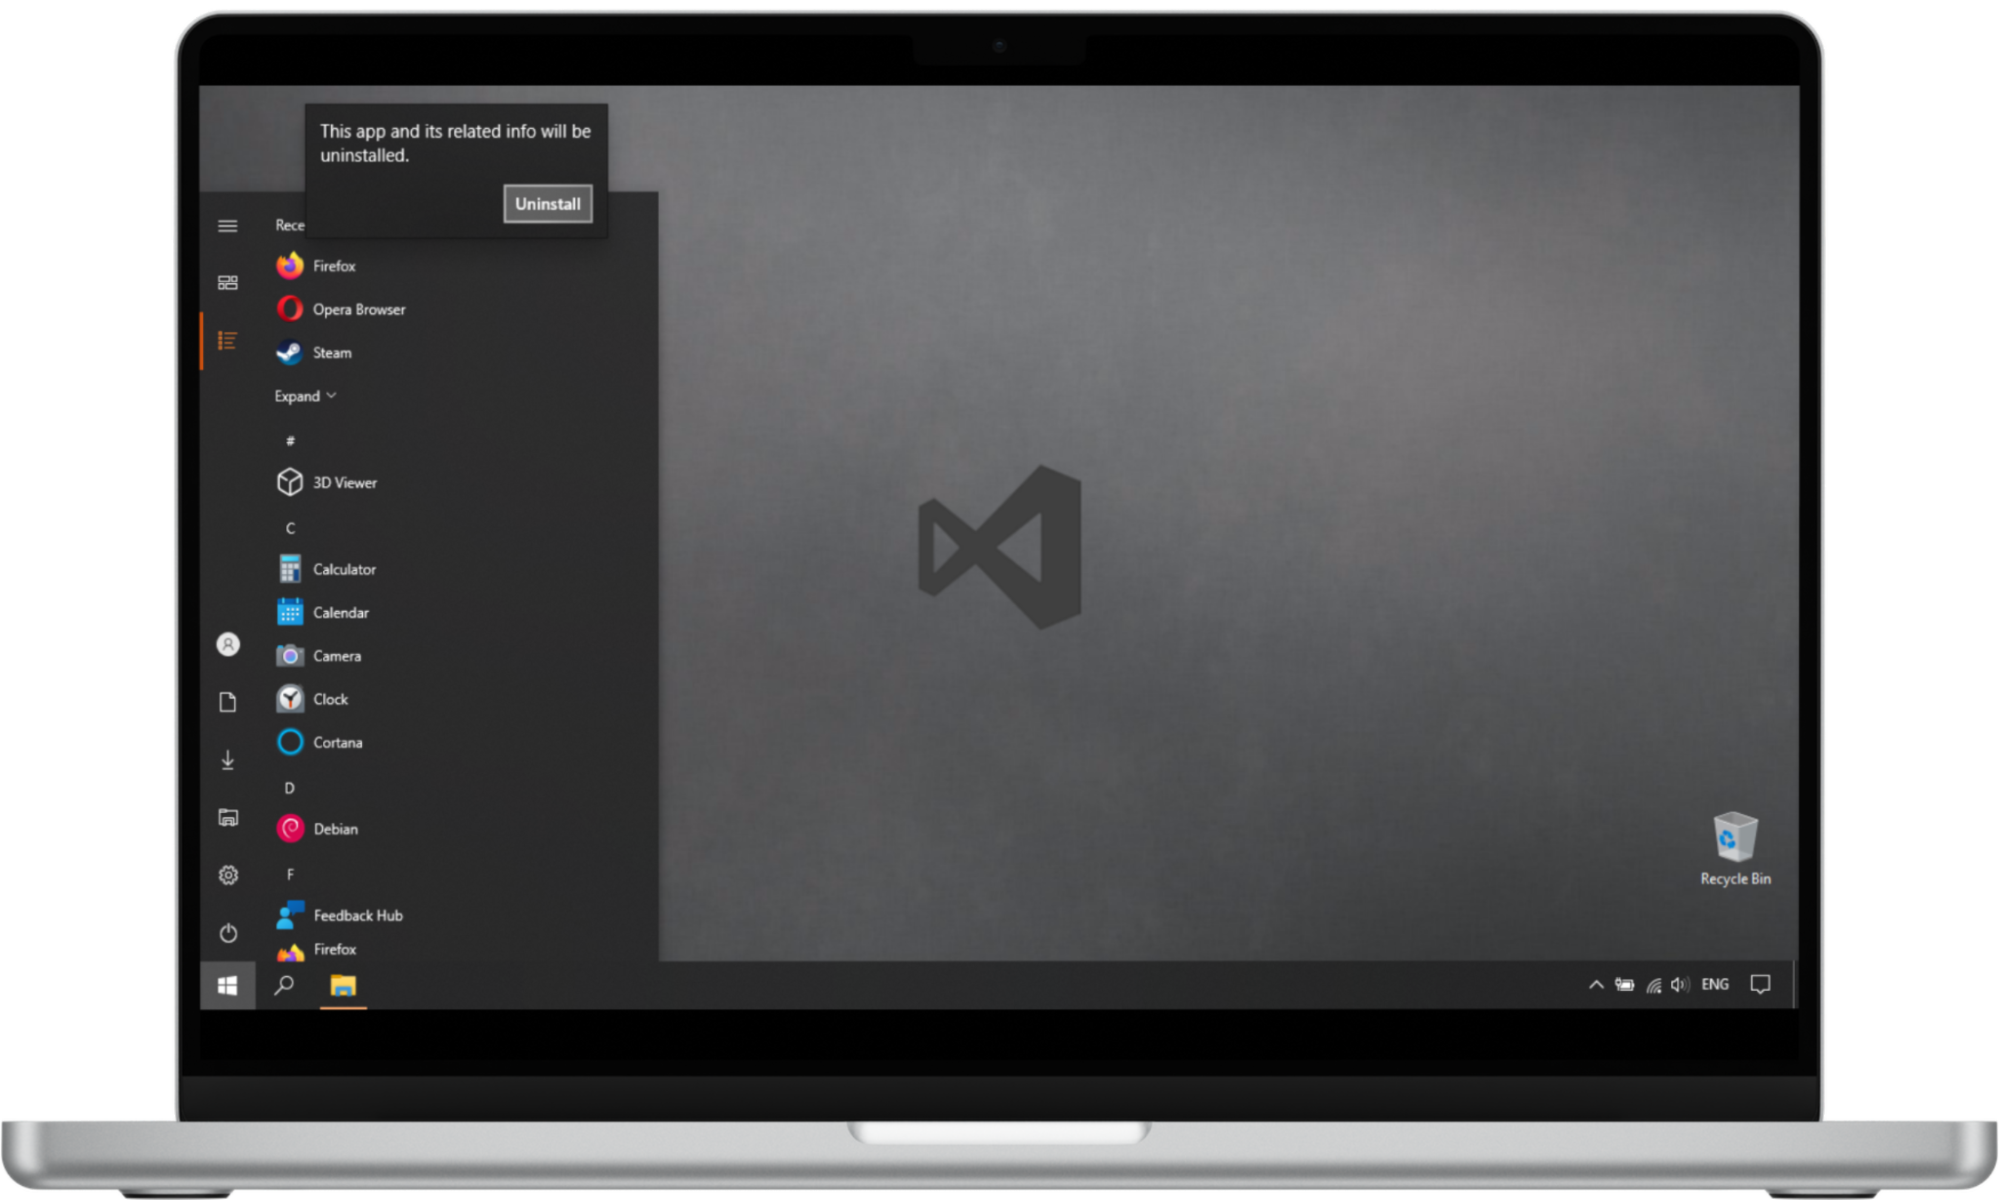
4. Uninstall recently installed software
Here’s how to uninstall apps on Windows:
On Windows 11:
- Click on the Start menu > All apps and find the target app on the list.
- Right-click on the app, then choose the Uninstall option.
On Windows 10:
- Click on the Start menu and look for the app you want to uninstall.
- Right-click on the app and select Uninstall.
5. Roll back drivers
IT expert warns you
Rolling back a driver update on Windows 11 will require having a Virtual Machine. It is recommended you do not do it unless you have the necessary experience. Hire an IT expert to roll back your update, or contact Clario AntiSpy IT support to guide you through the process.
To roll back a driver update on Windows 11:
- Type Device Manager in the Windows search bar and press Enter.
- Find the driver you want to roll back drivers for, right-click on it, and choose Properties.
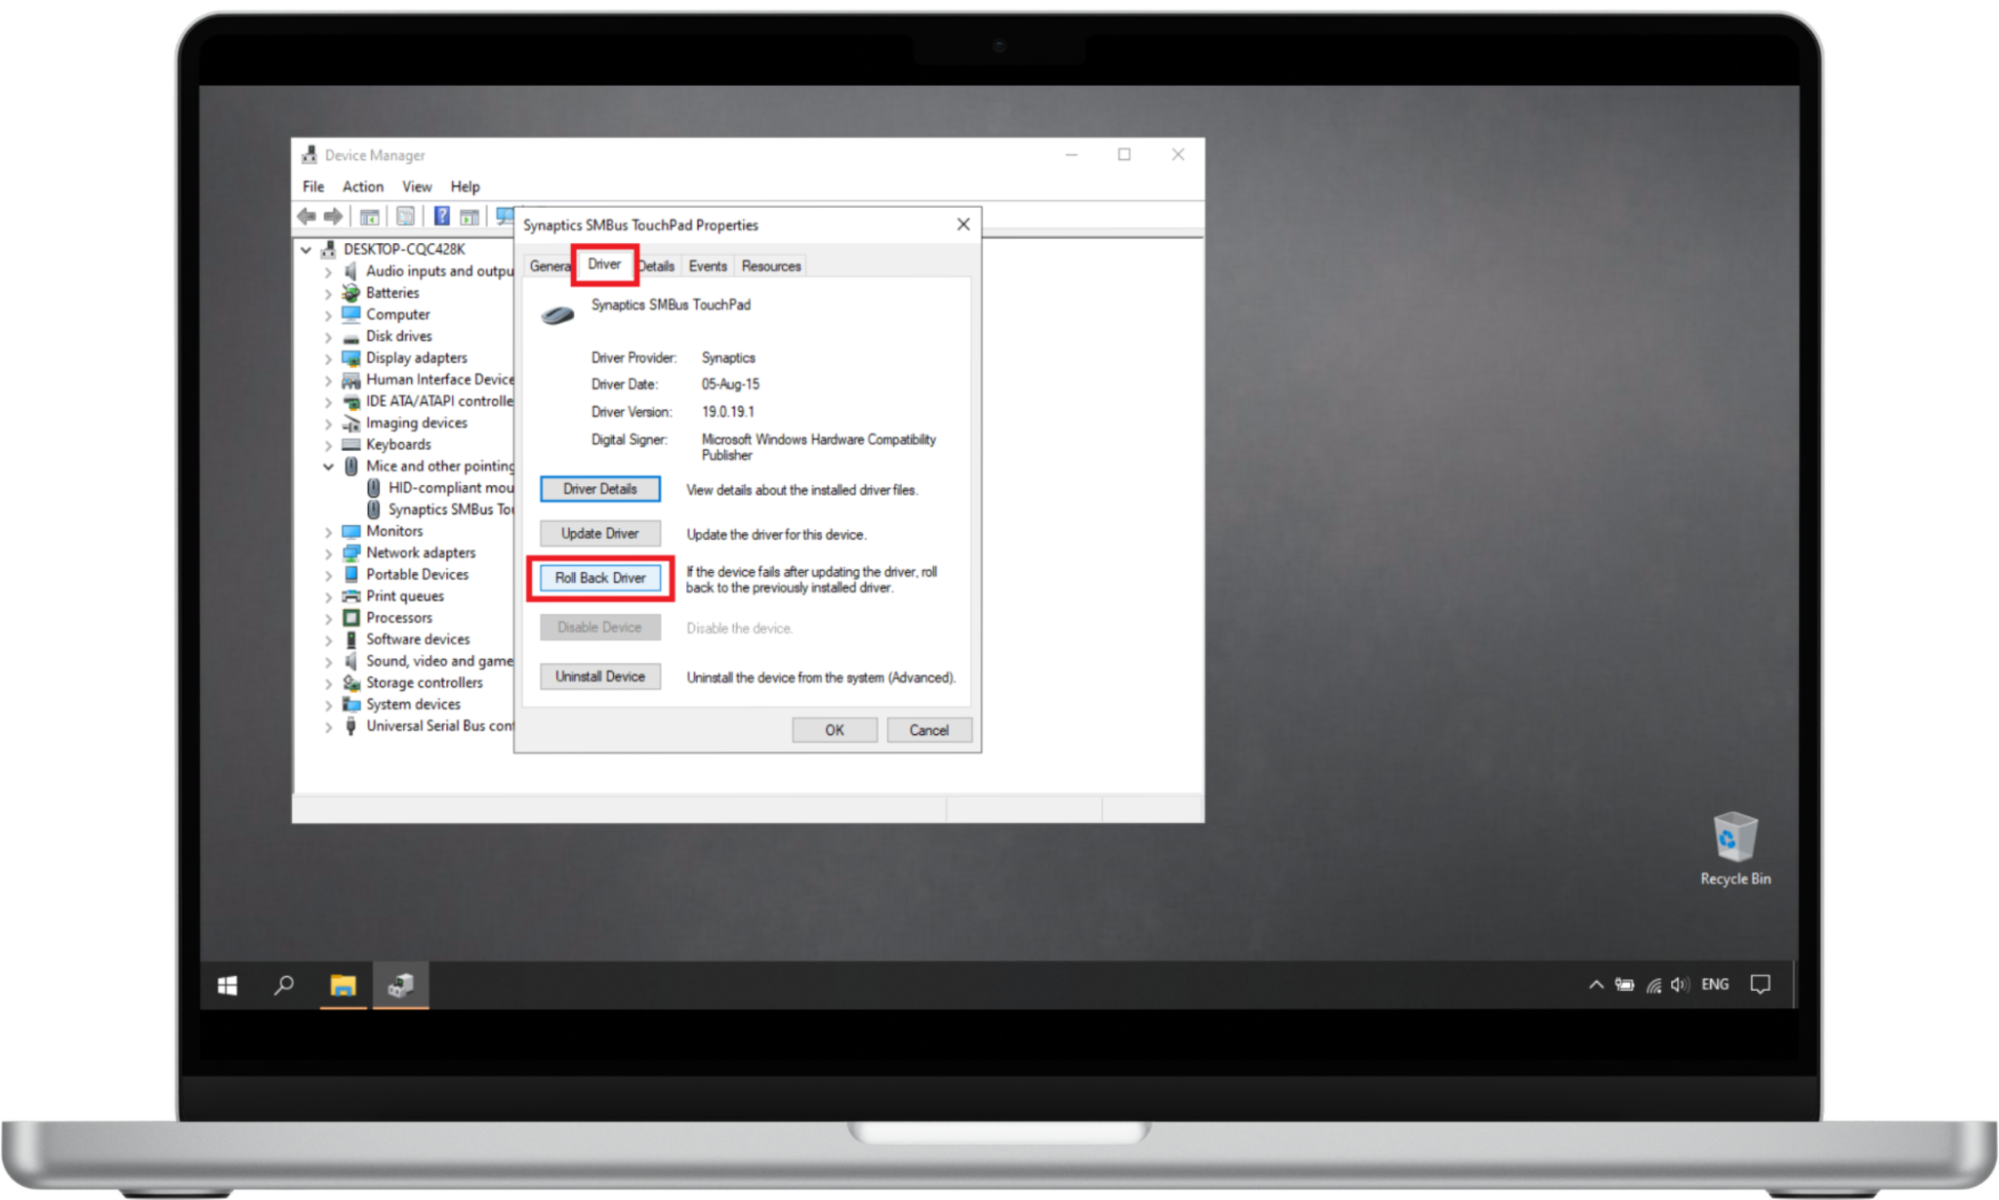
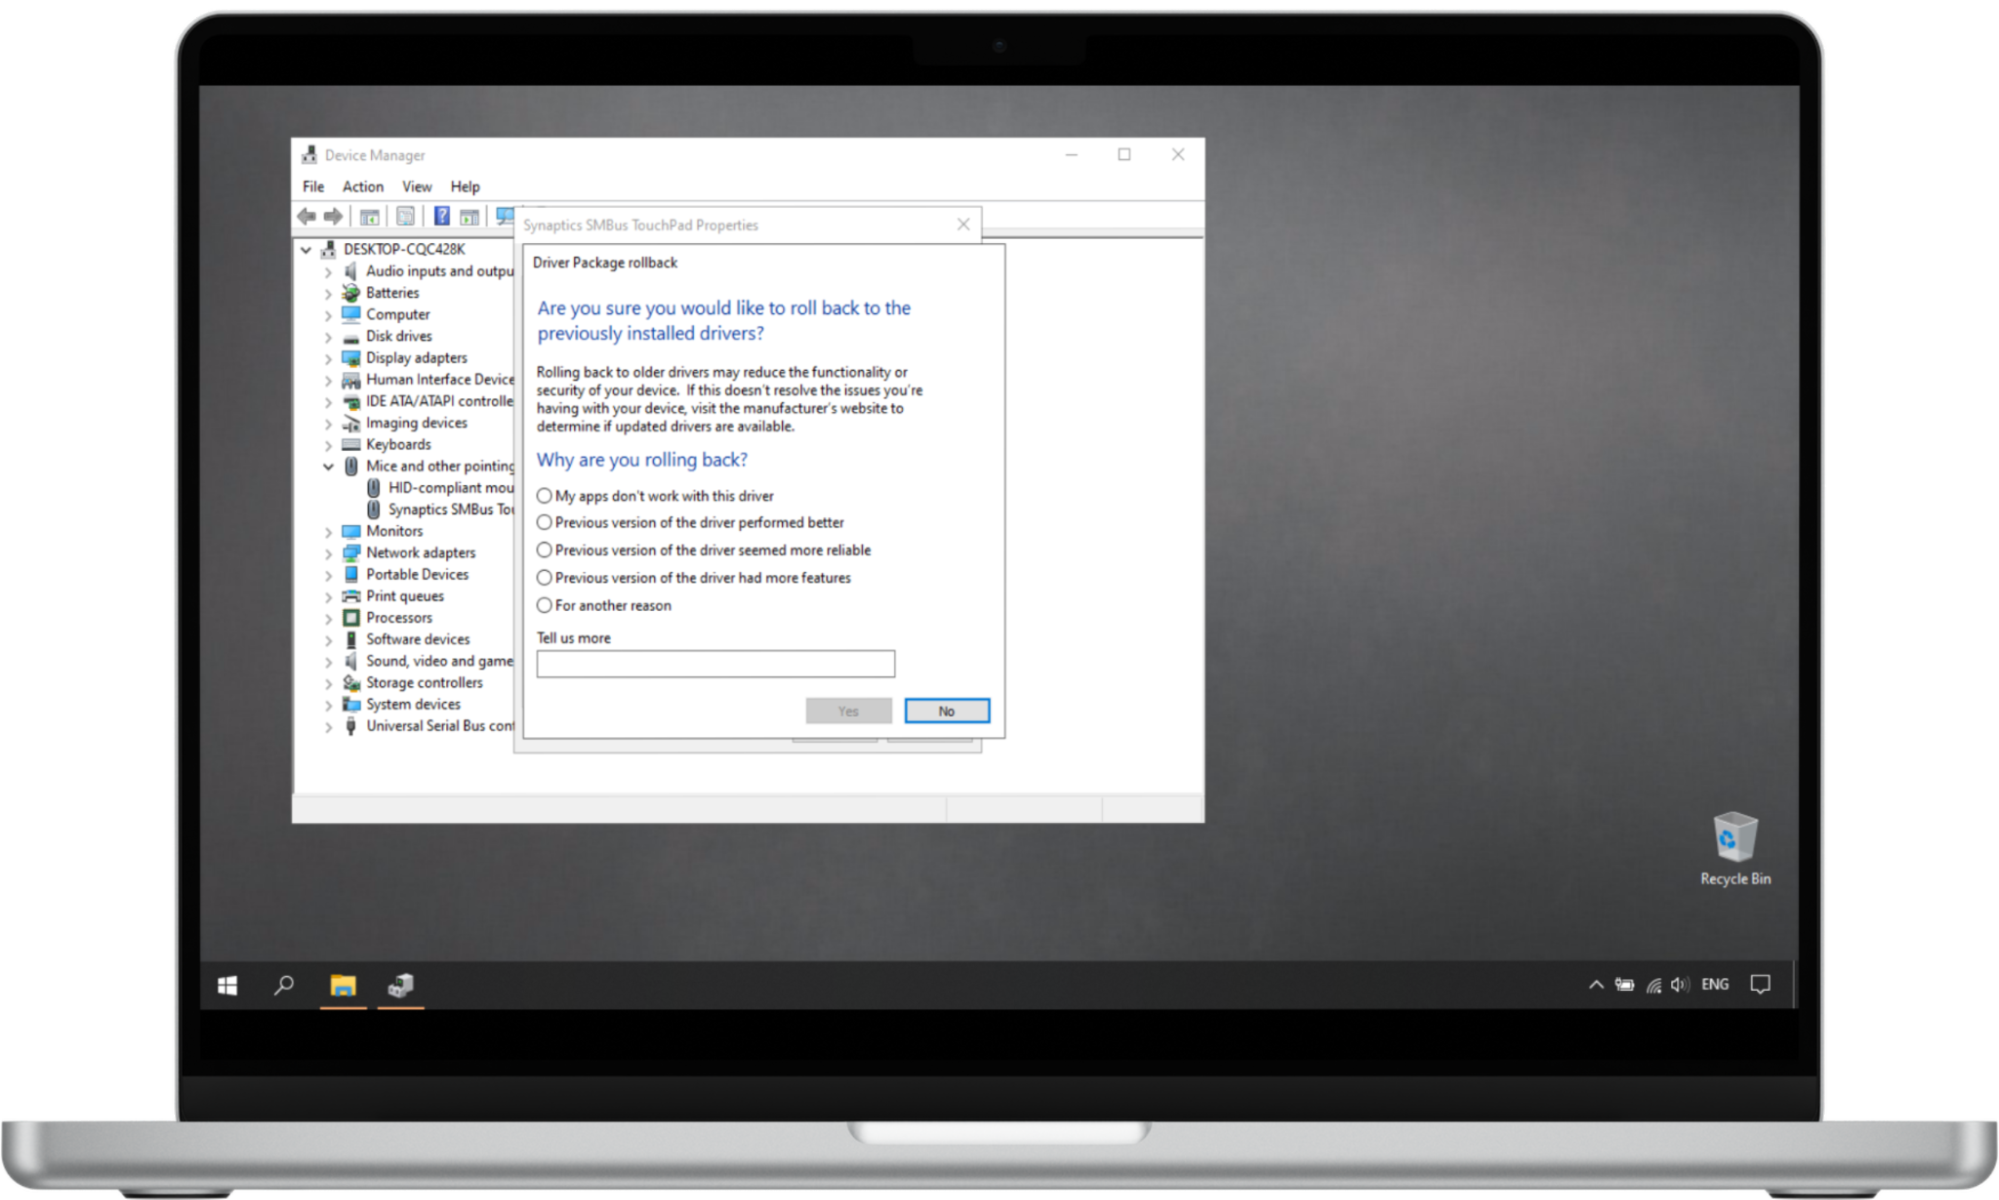
- Click the Driver tab, select the Roll Back Driver option, choose a reason, and click Yes.
Note
If the Roll Back Driver button is grayed out, it means a previous version of the driver doesn’t exist on the system.
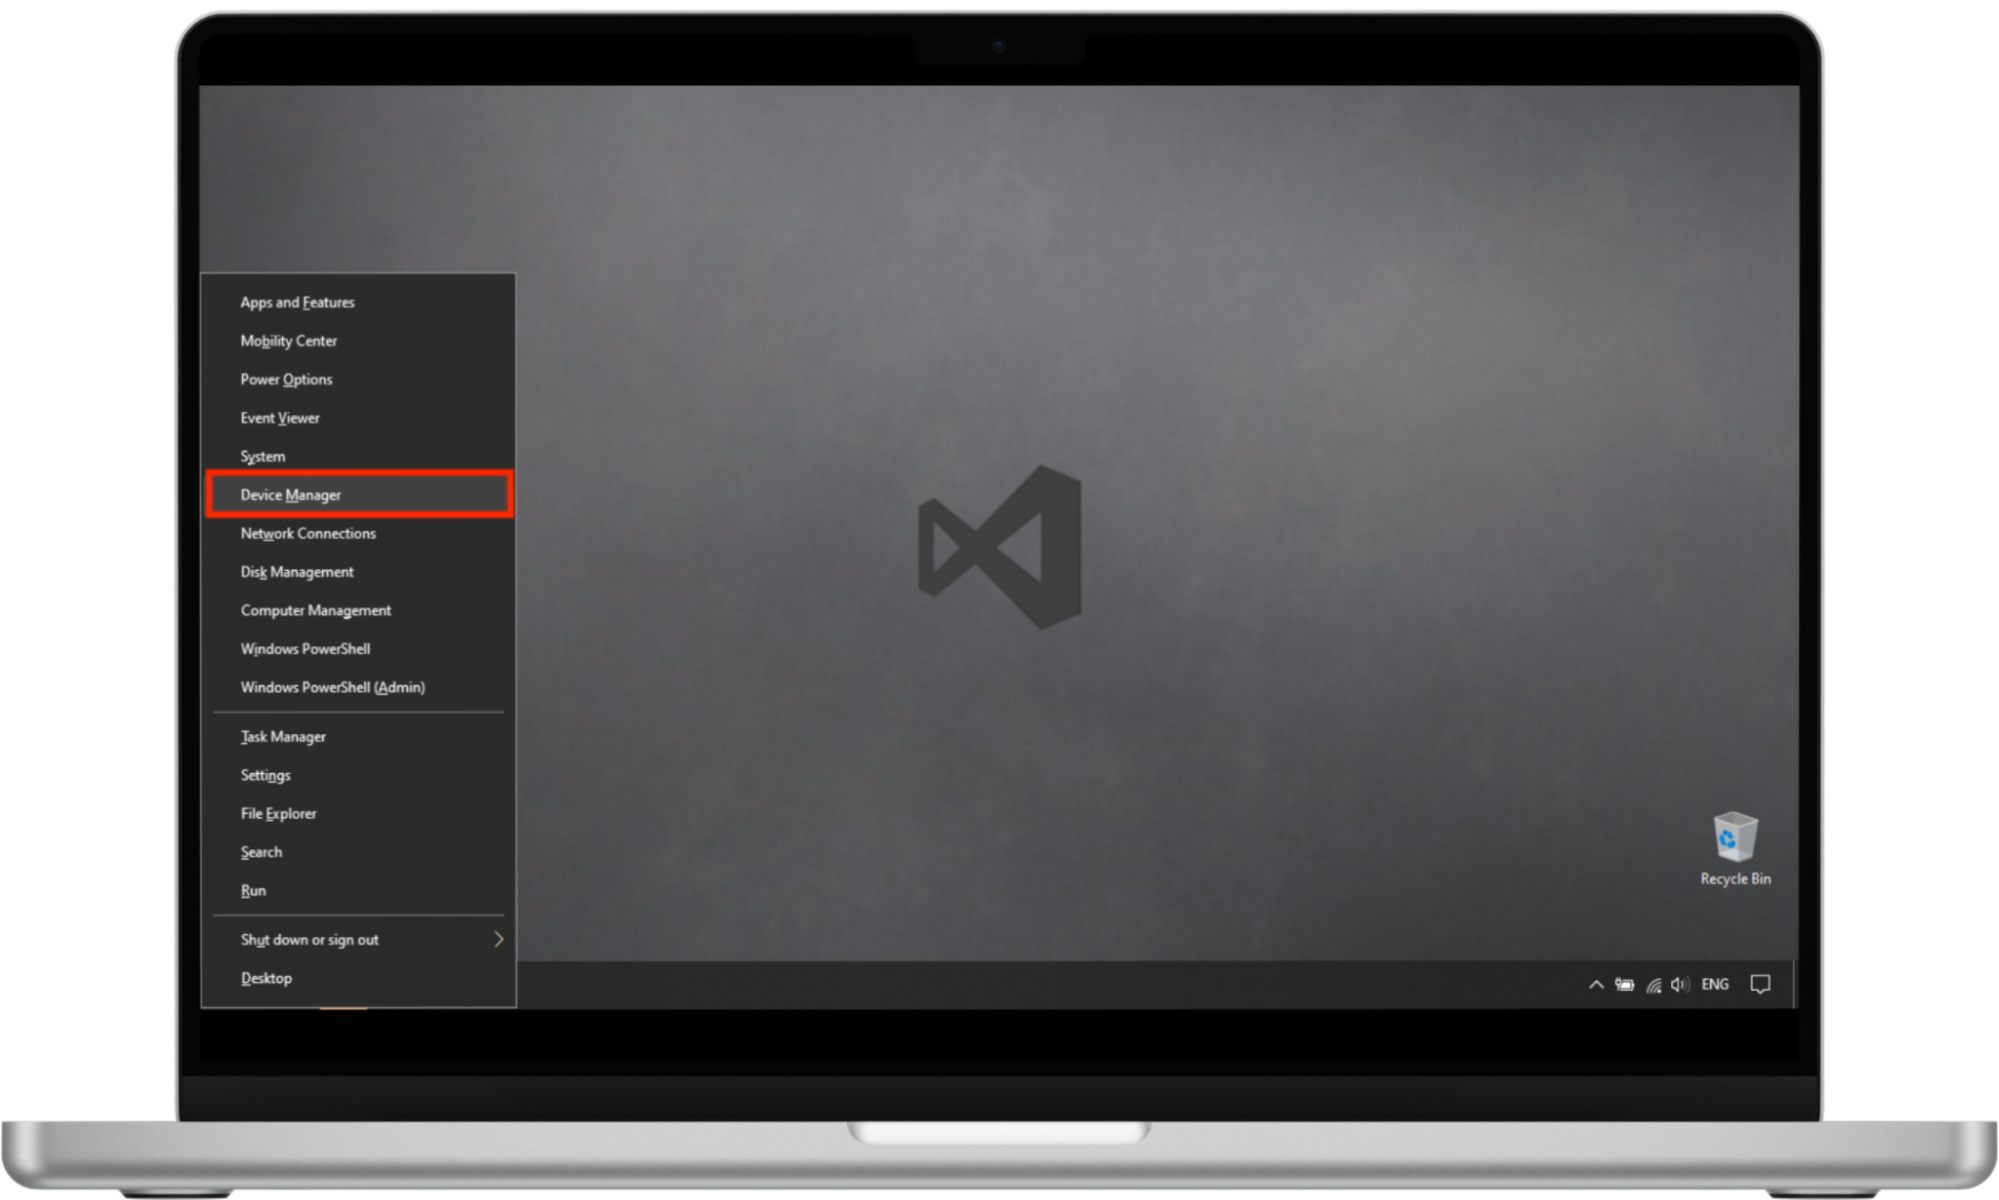
On Windows 10:
- Open Device Manager using the shortcut Windows key + X, then select the Device Manager option on the menu.
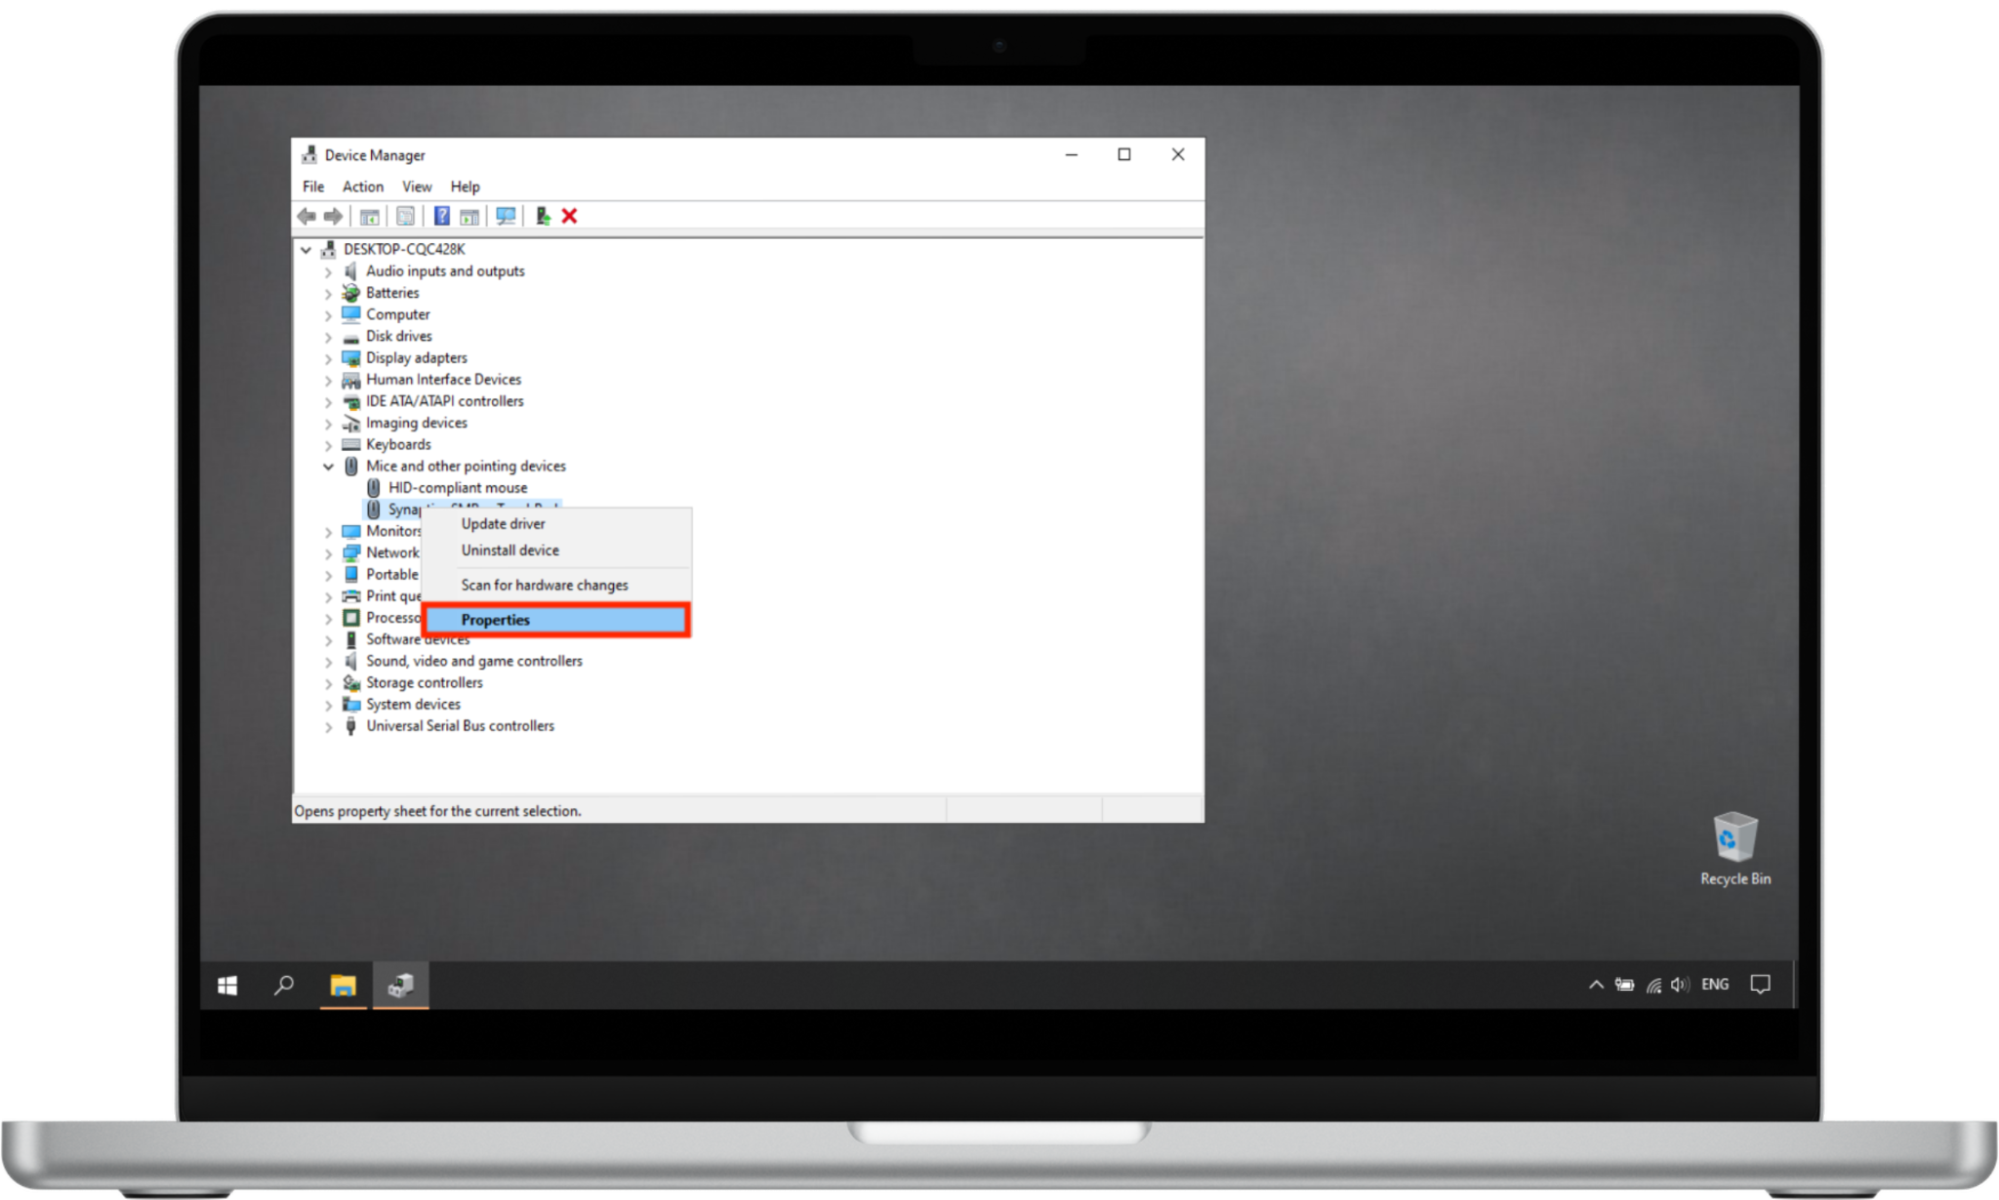
- Find the device whose driver you want to roll back and expand it.
- Right-click on the device and choose Properties.
- Next, click on the Driver tab, followed by Roll Back Driver.
- Now, follow the on-screen prompts to complete the process.
6. Scan for malware
How to run a malware scan manually on Windows 10 and 11:
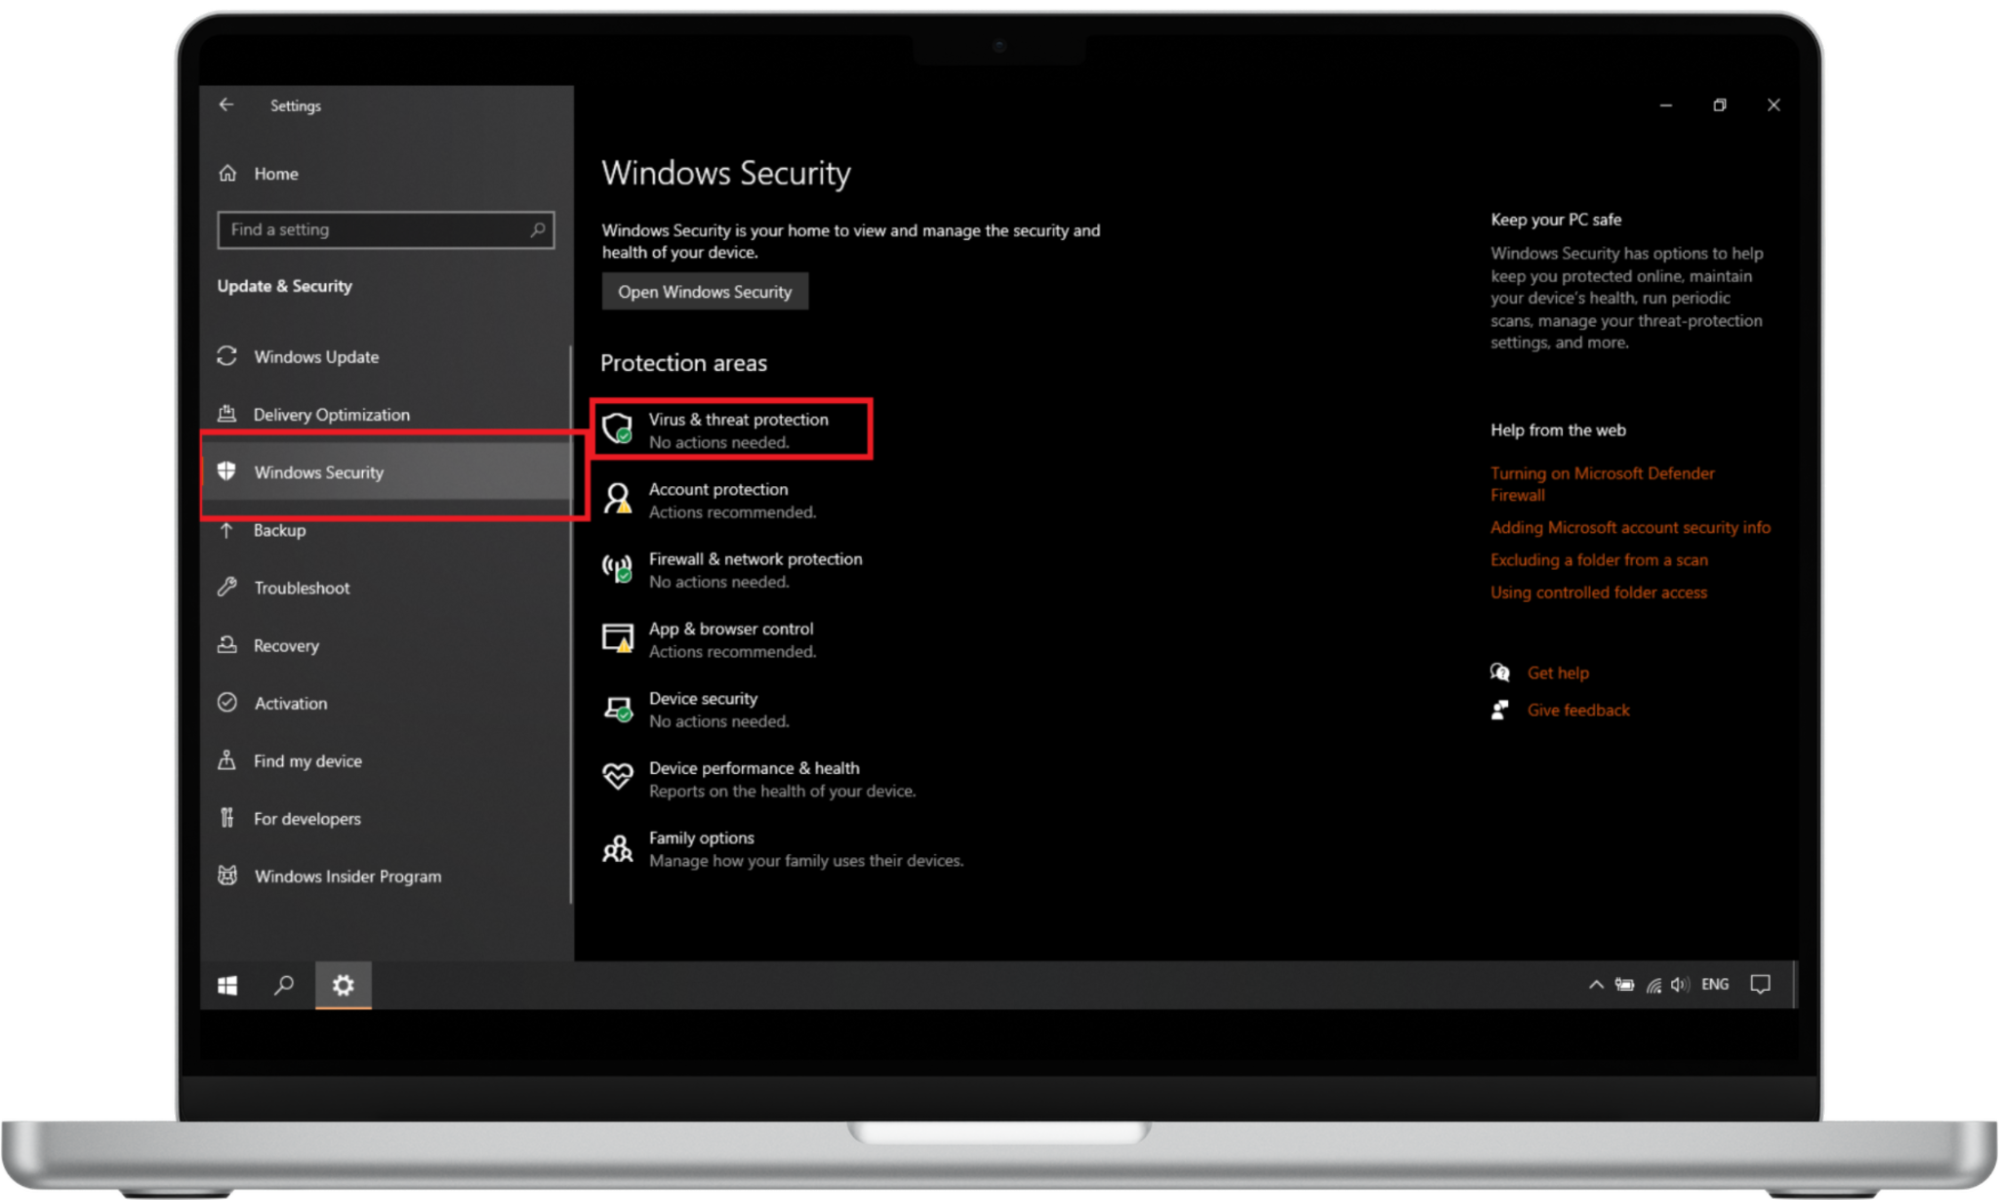
- Select Start > Settings > Update & Security > Windows Security > Virus & threat protection.
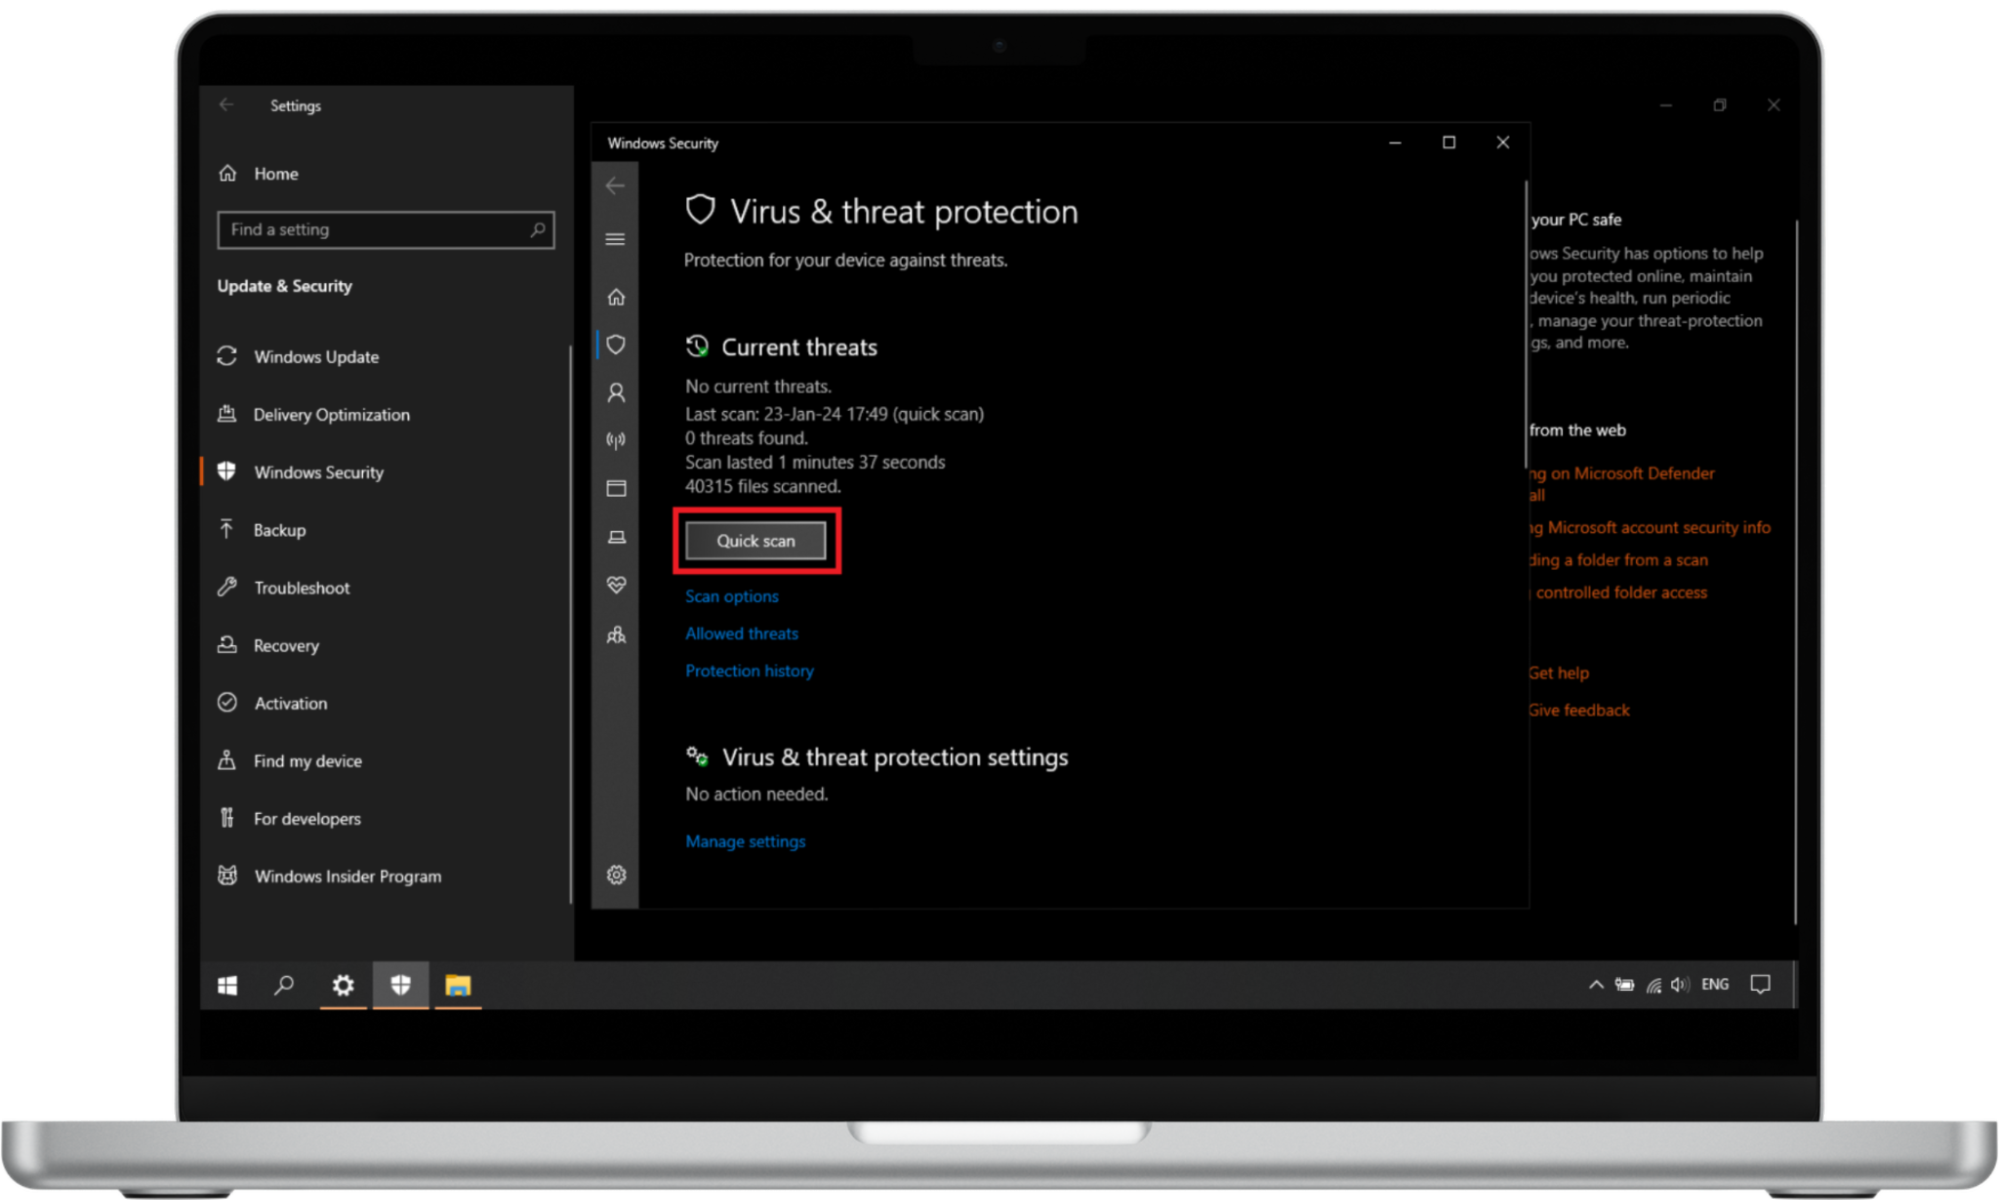
- In the Current threats section, click Quick scan (in early versions of Windows 10, go to Threat history, and click on Scan now. On Windows 11, you may have to click on Show more options after selecting the option to scan the file or folder).
Note
The option to run a quick scan for malware threats isn't available for users running Windows 10 or 11 in S mode because of streamlined security.
7. Run an SFC Scan
On Windows 10 and 11:
- Open Command Prompt > Run as administrator.
- Type DISM.exe /Online /Cleanup-image /Restorehealth and hit Enter.
- Now type sfc /scannow and press Enter again.
- Finally, type exit and press Enter once you see the Verification 100% complete message.
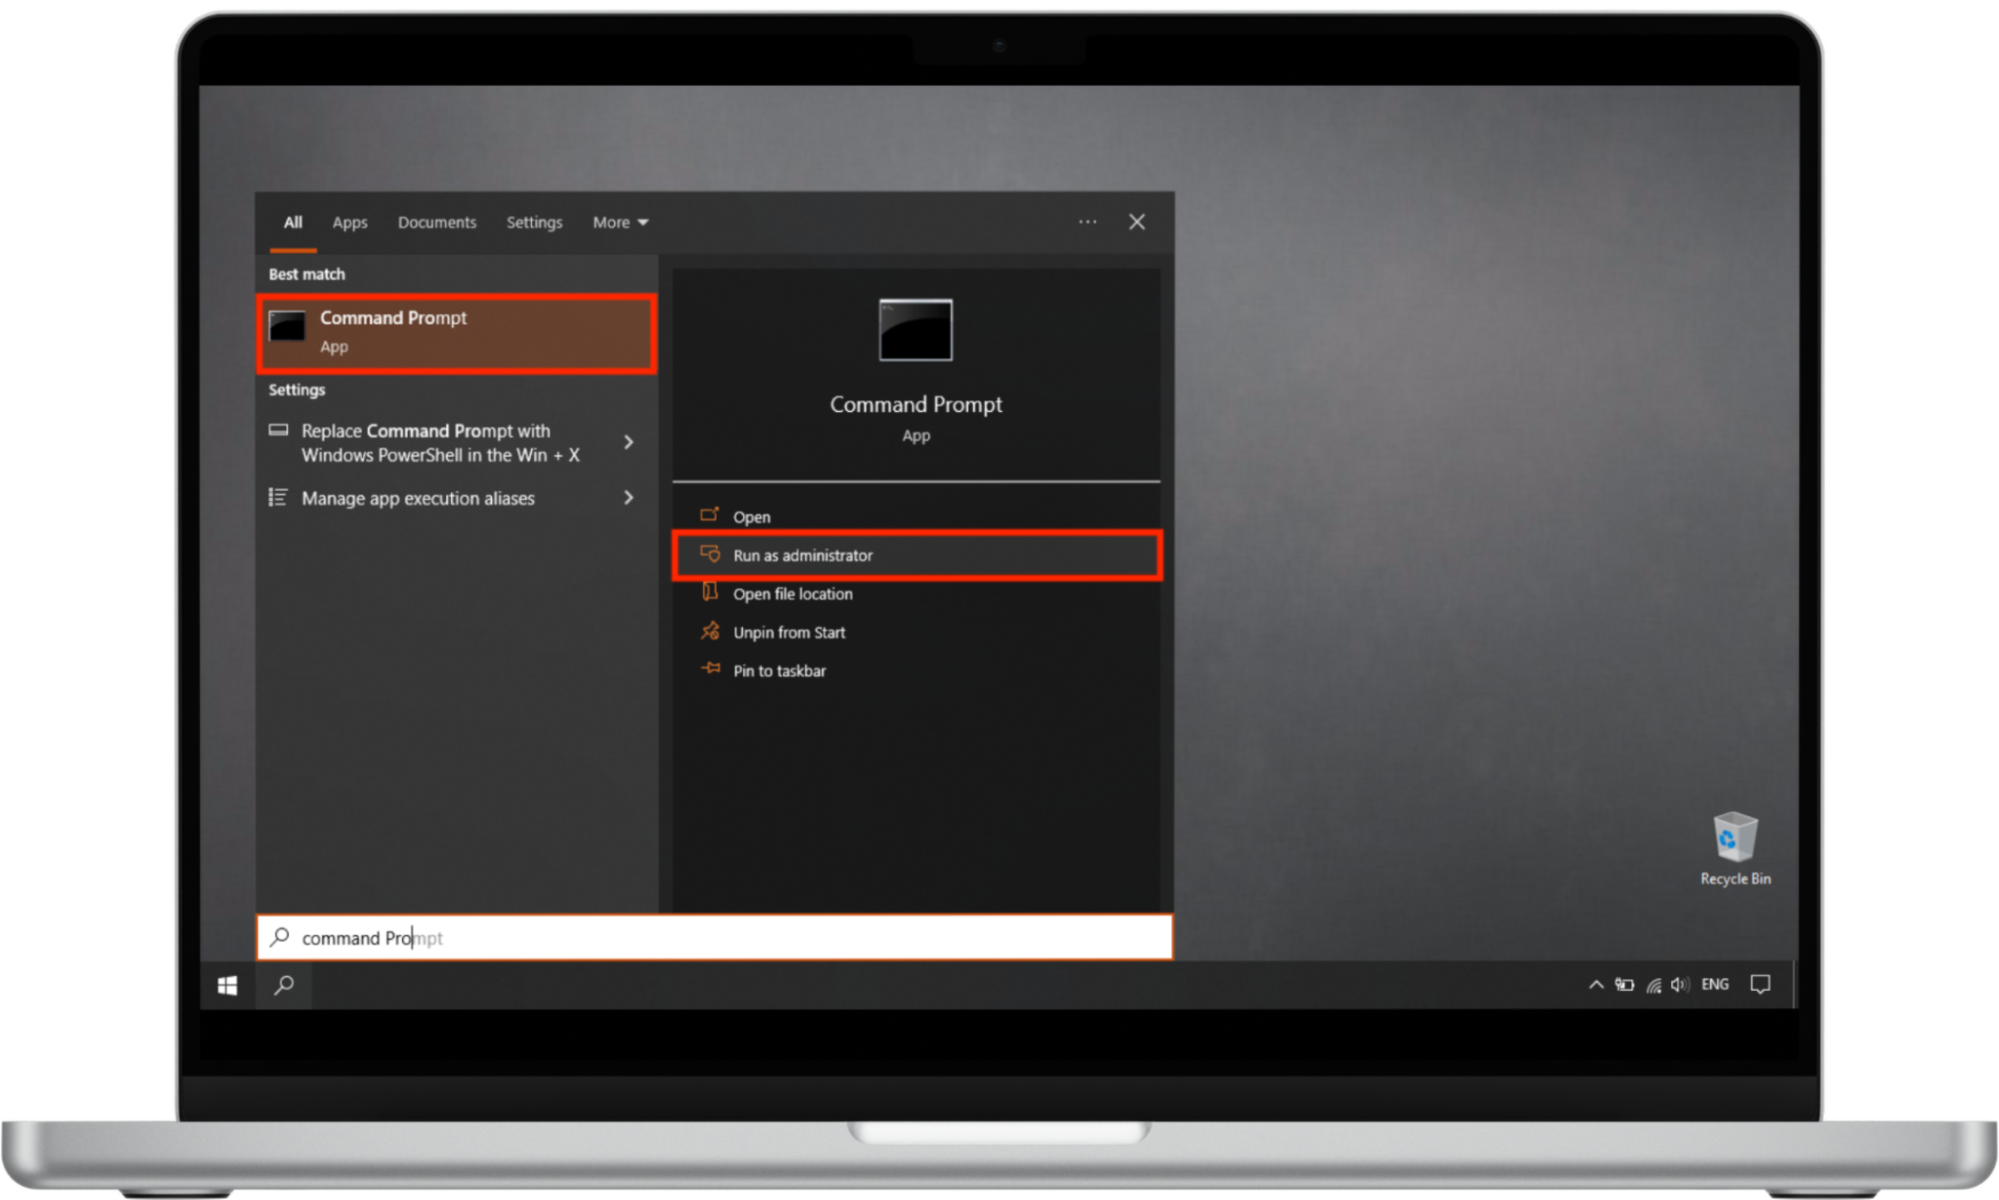
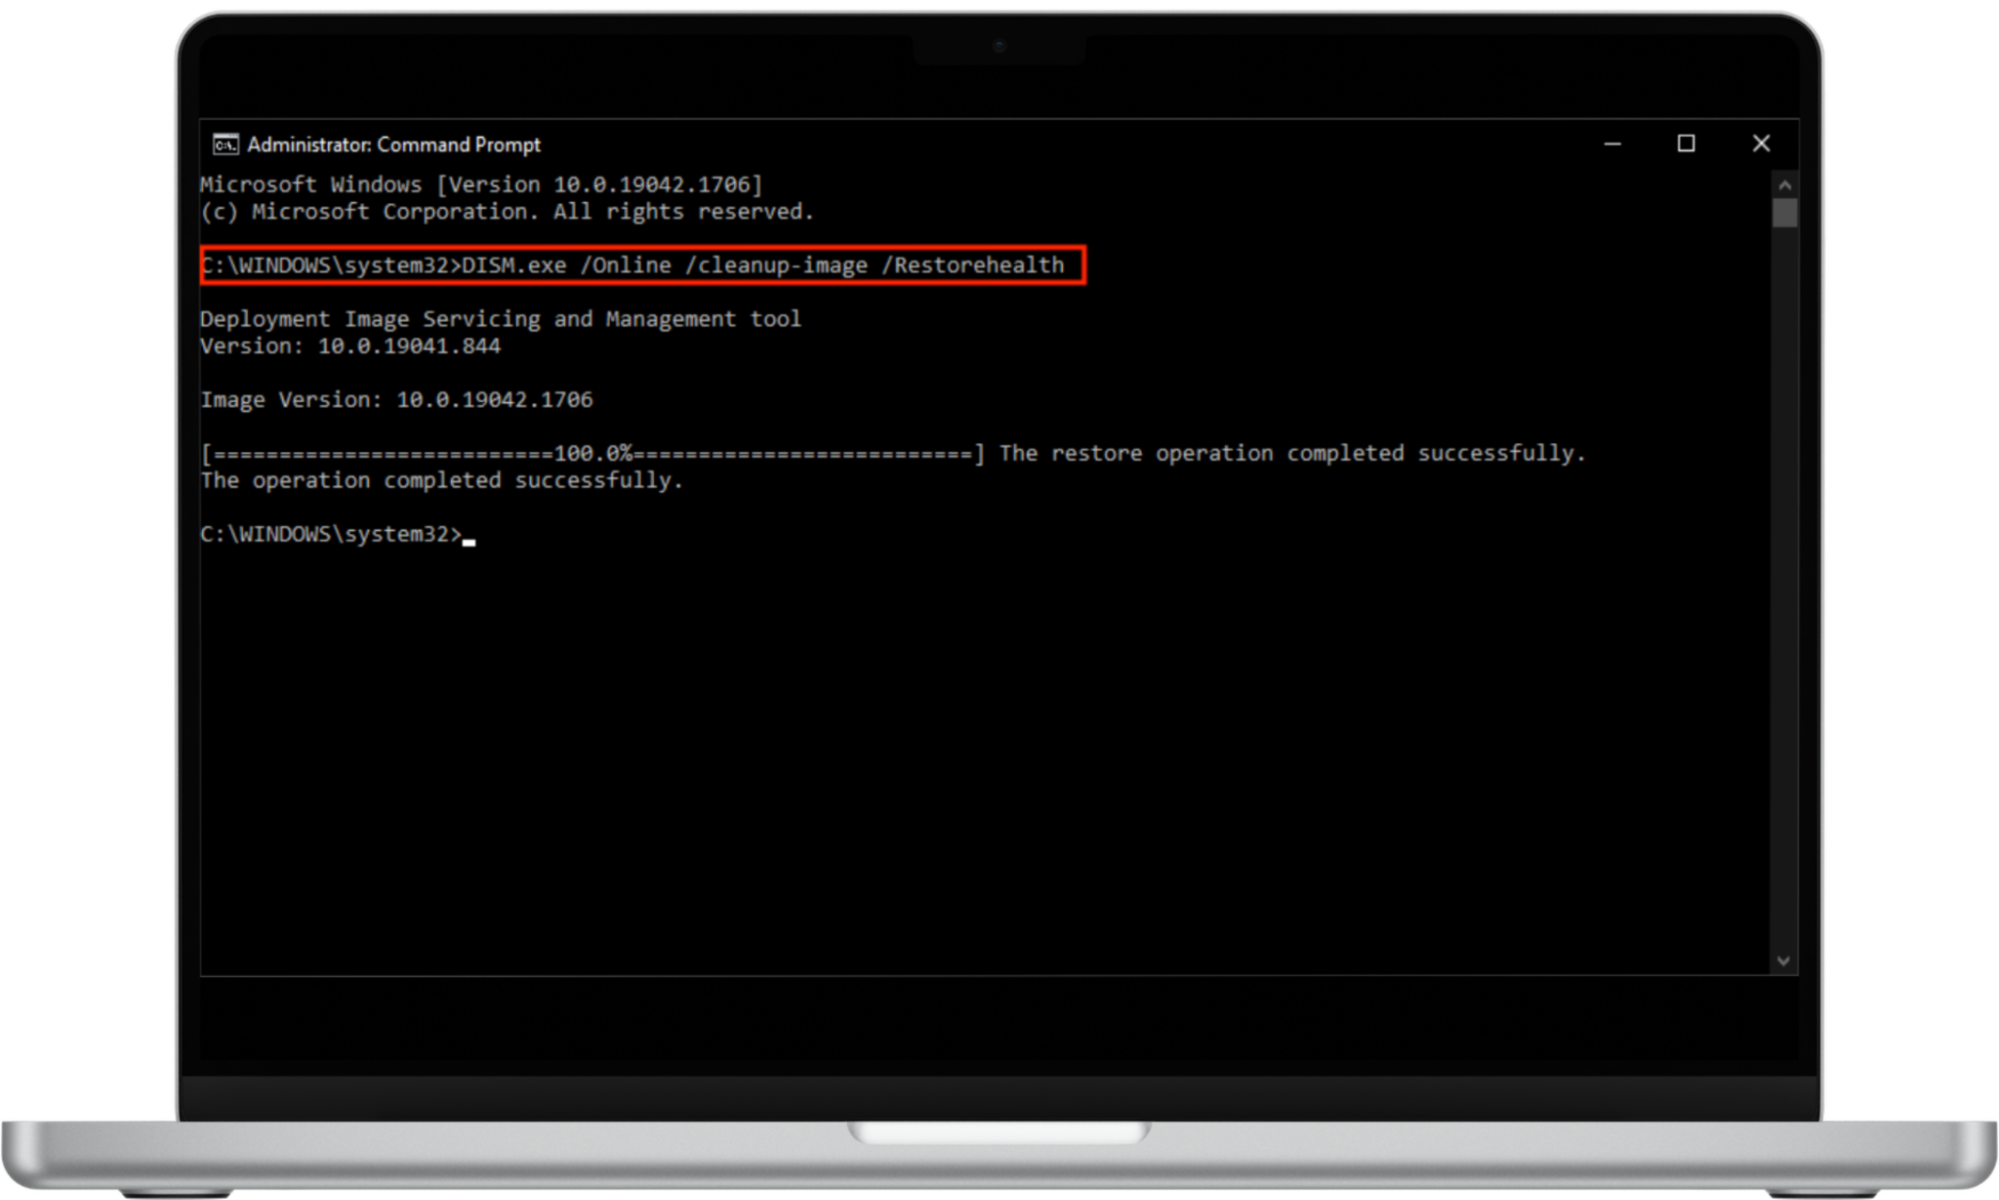
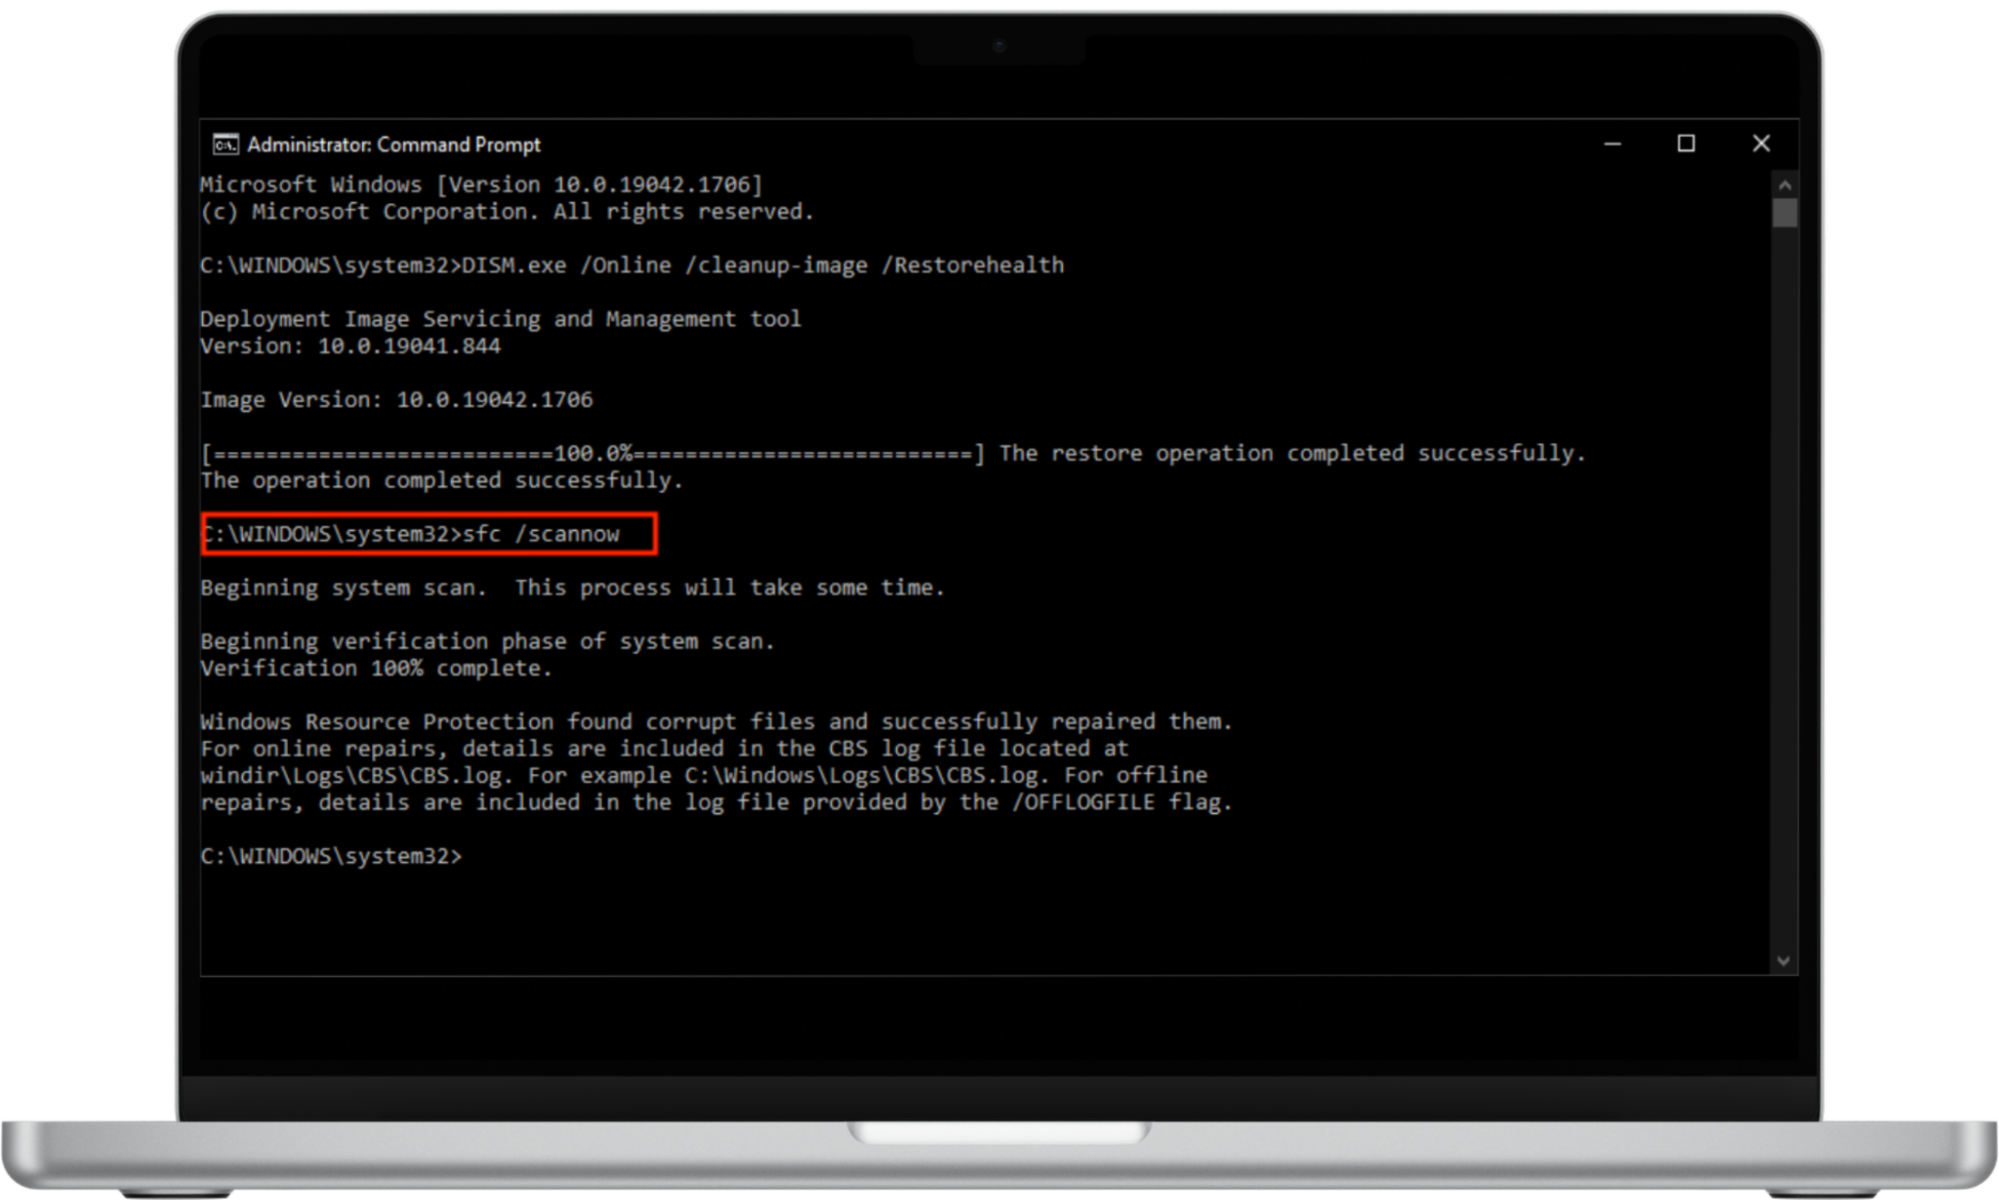
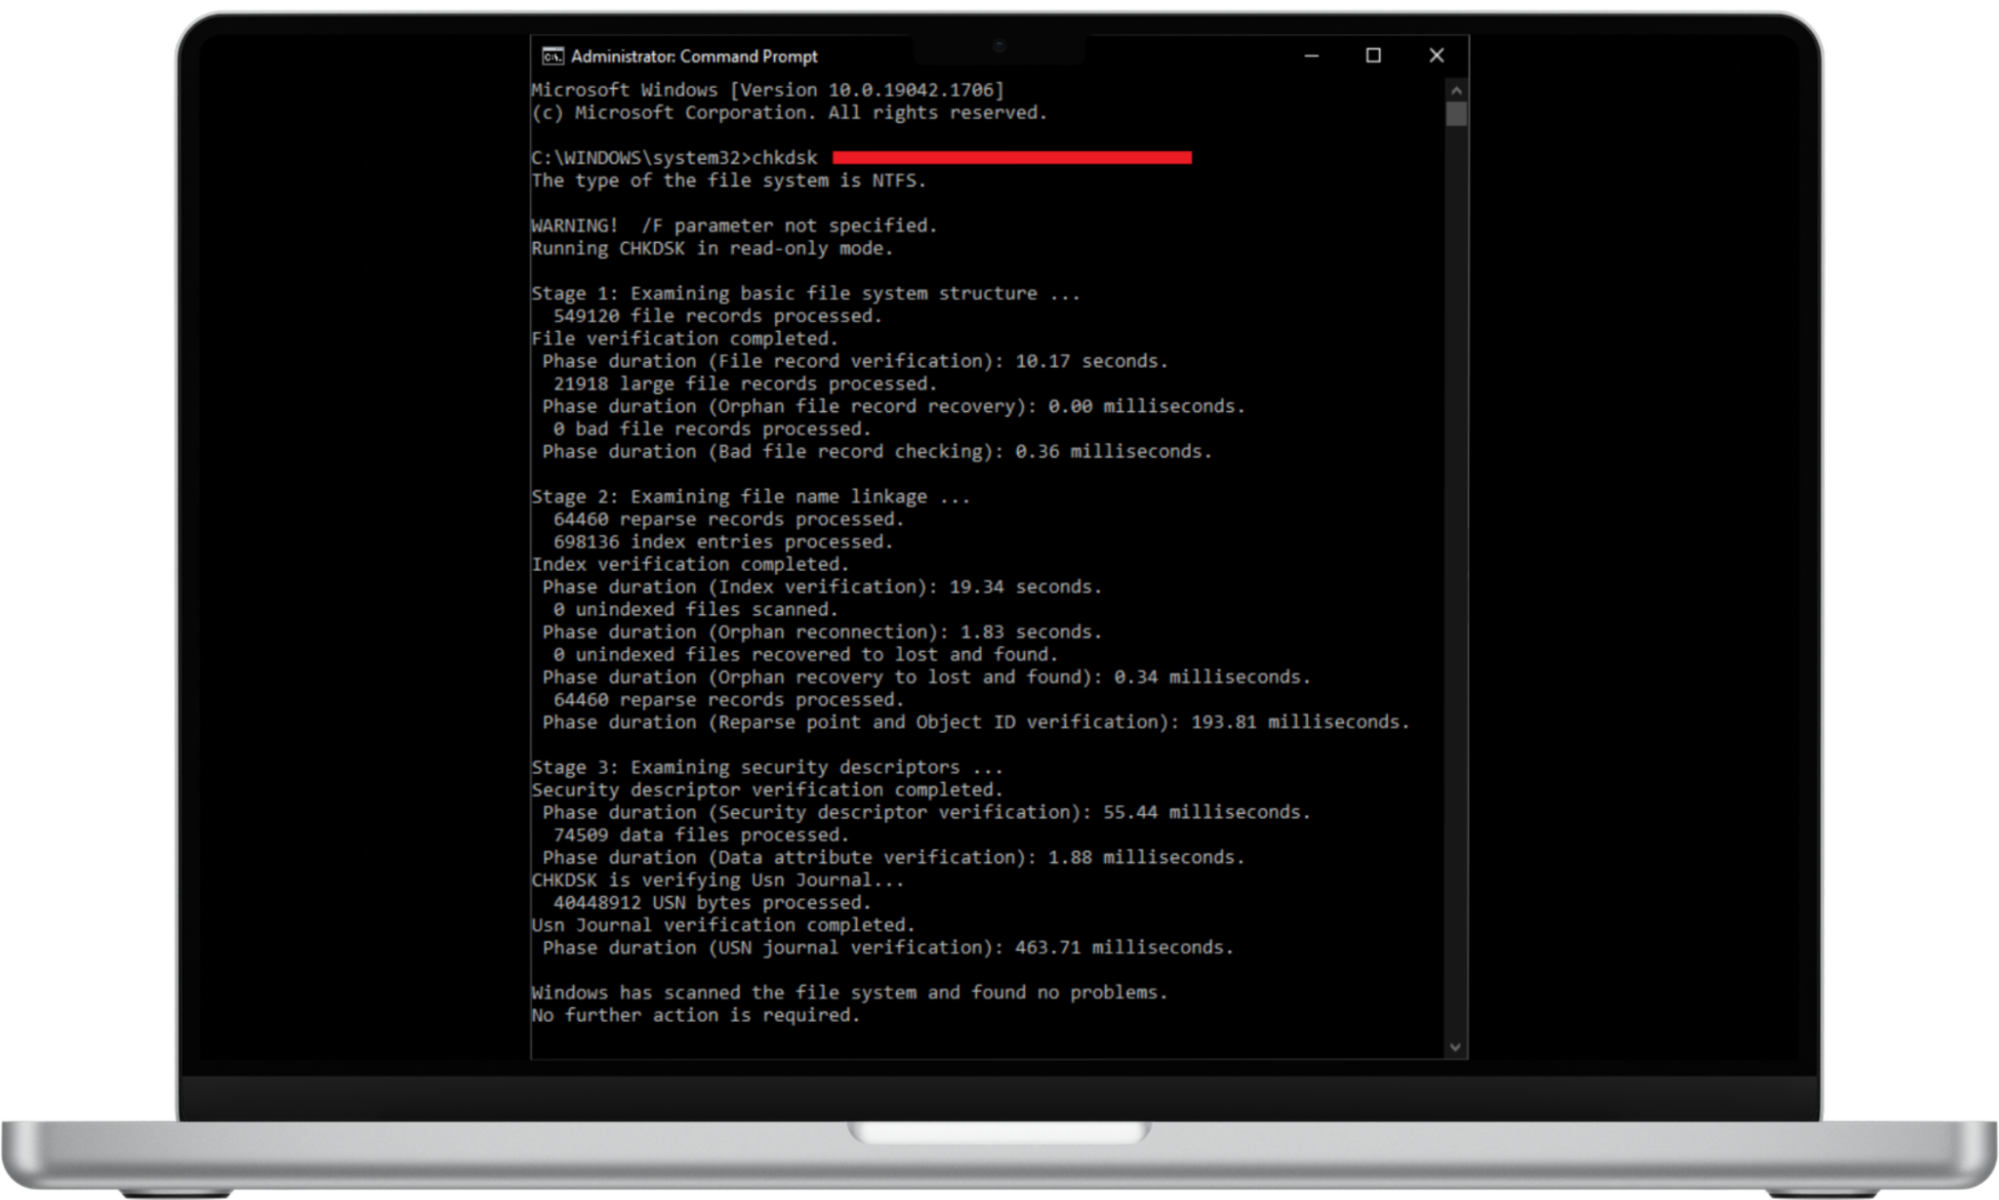
8. Scan your PC with CHKDSK
To run a CHKDSK scan on Windows:
- In the search bar, type Command Prompt or cmd and click Run as administrator.
- Now type chkdsk and hit Enter. The scan will commence to look for errors on the file system or physical disk damage.
- Repair any damage found by typing chkdsk /r into Command Prompt and pressing Enter.
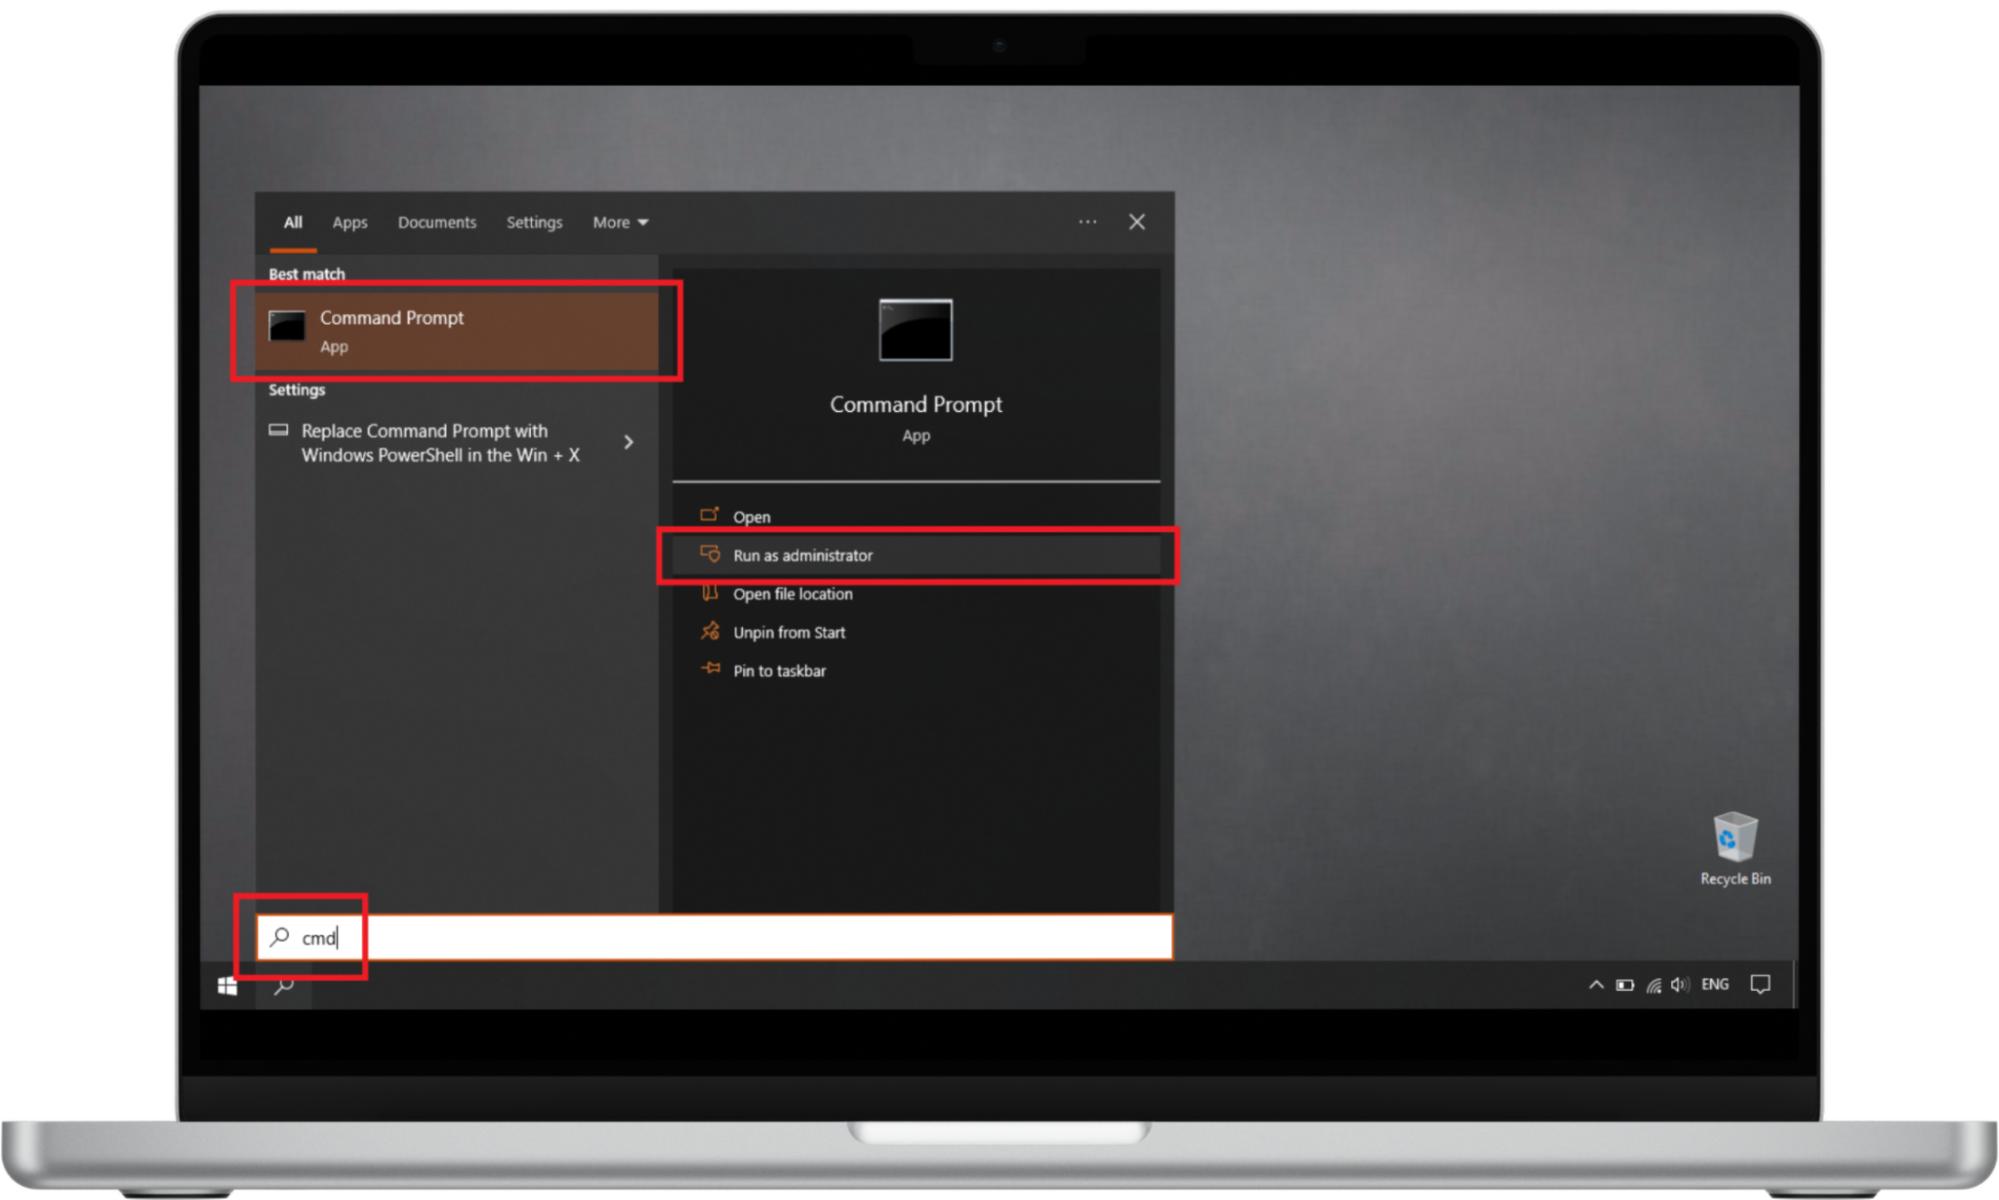
9. Check RAM using the Windows Memory Diagnostic tool
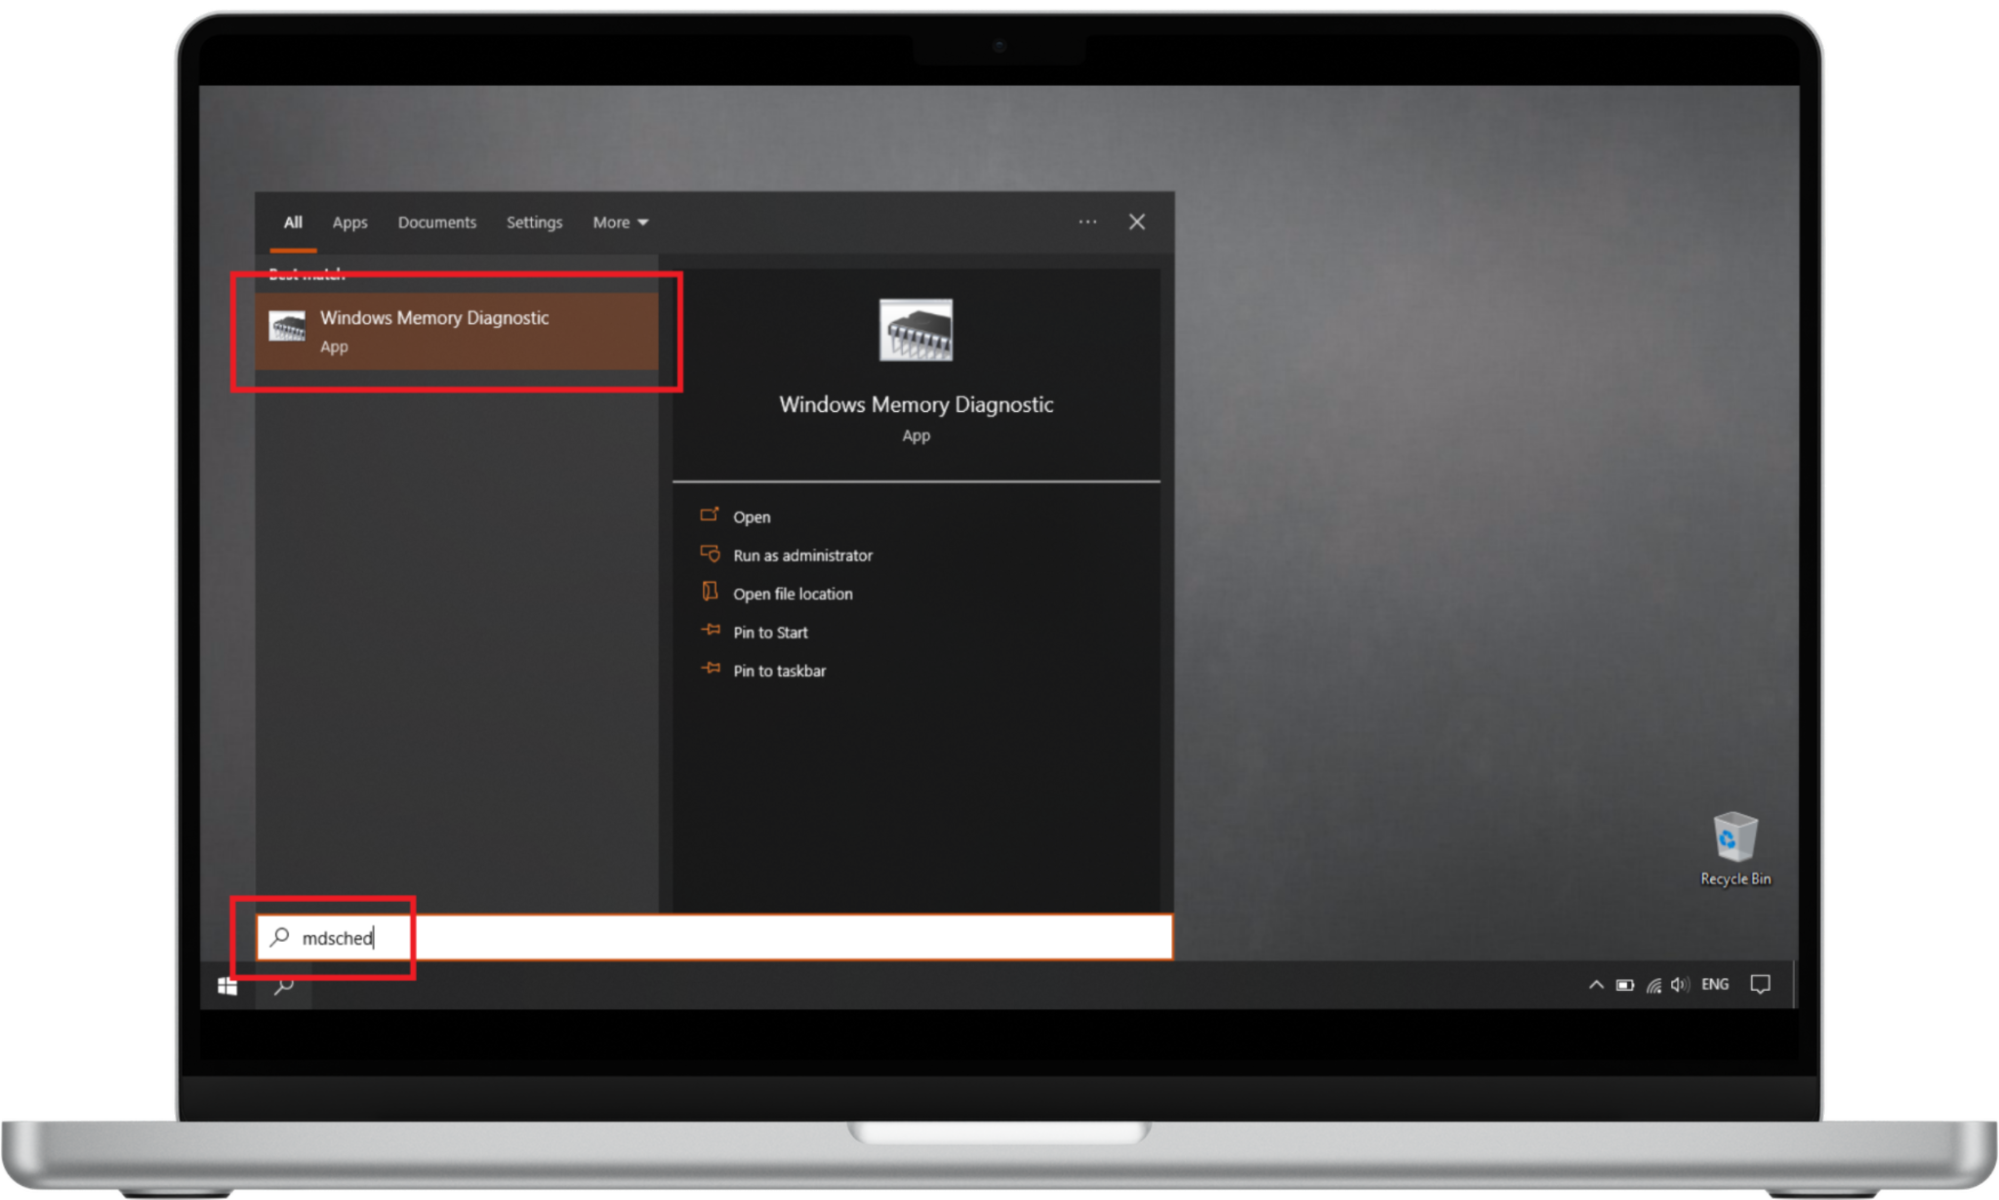
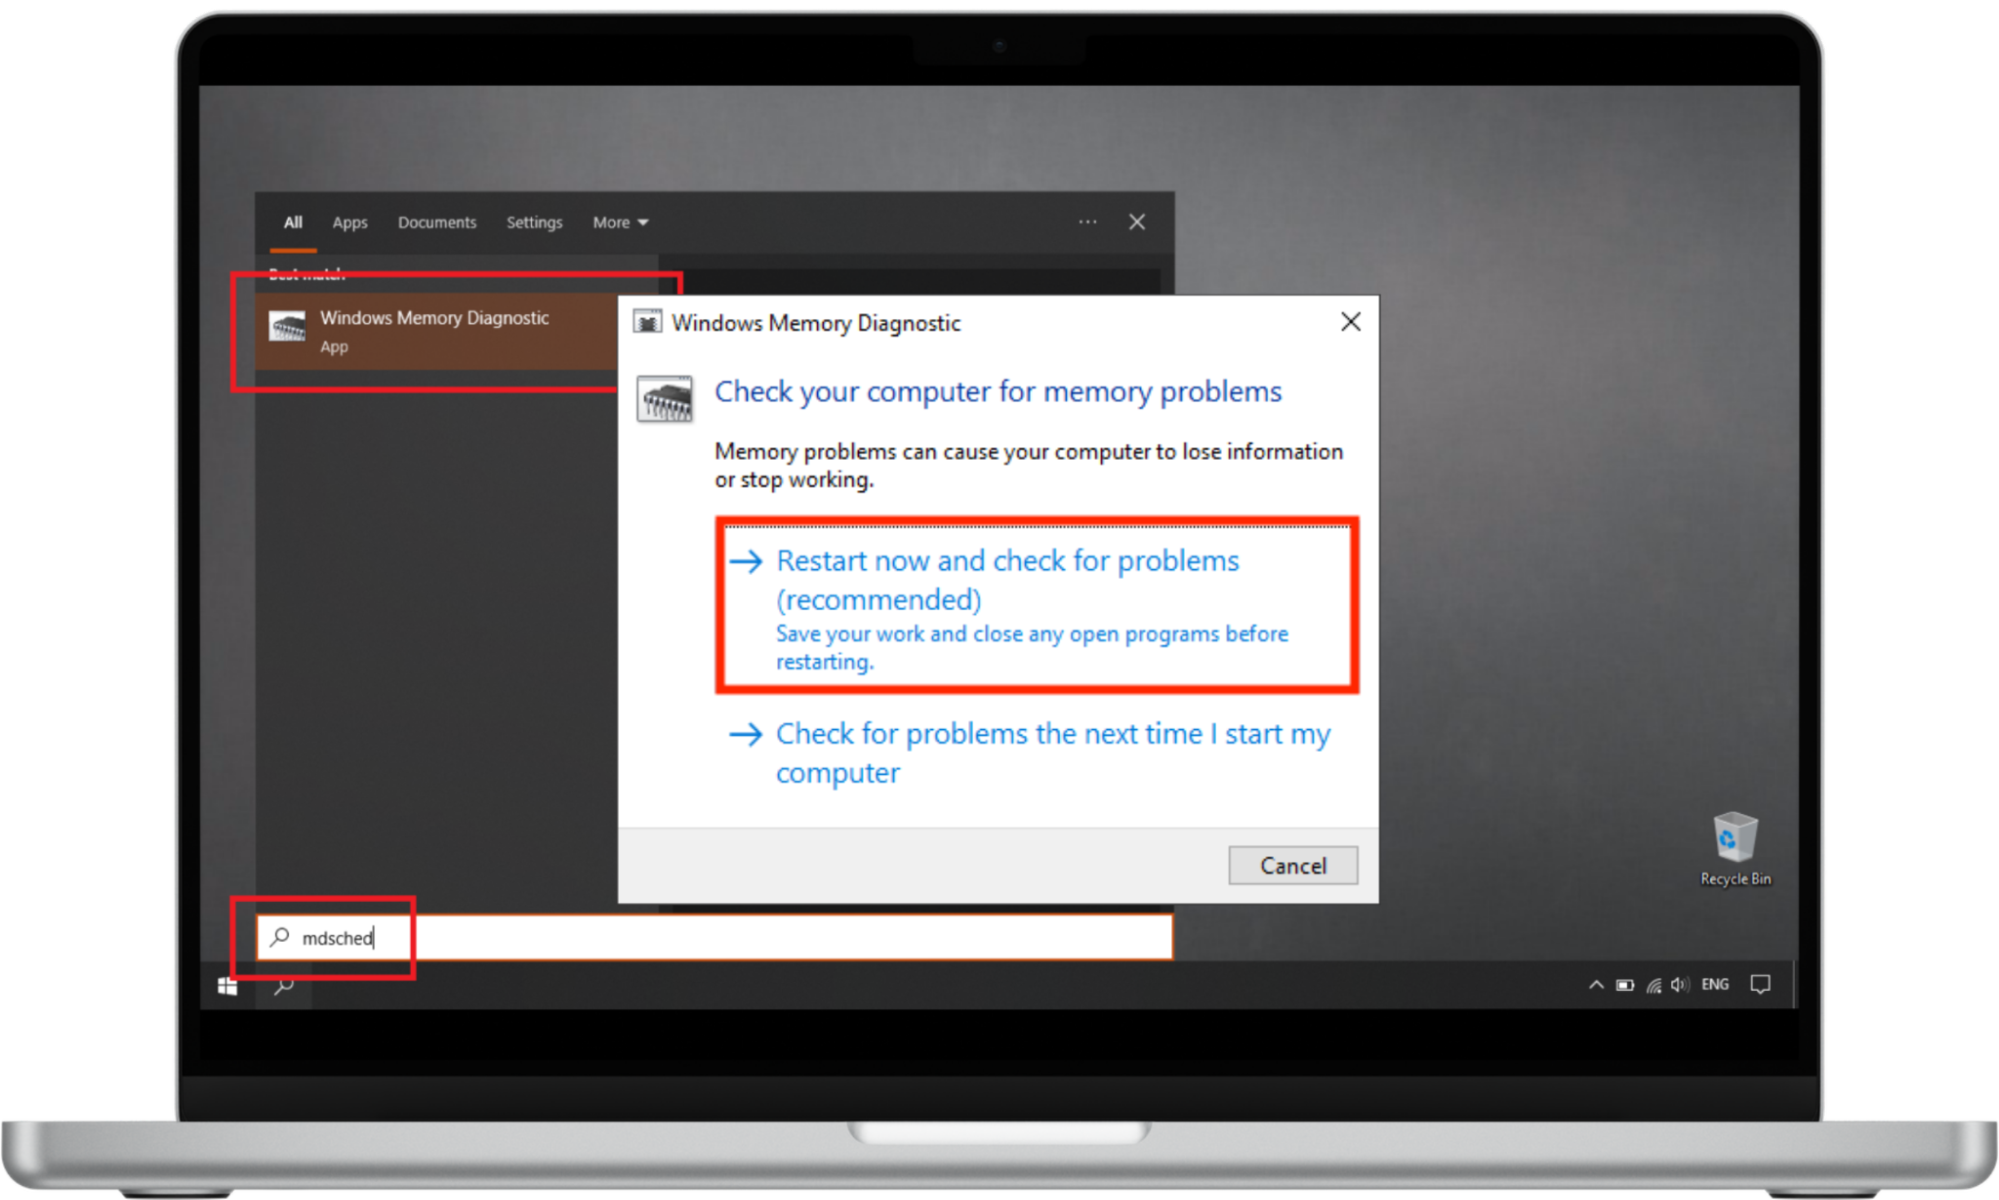
On Windows 10 and 11:
- Type mdsched in the search bar and press Enter.
- Now click on Restart now and check for problems (recommended). Don’t forget to save your work to avoid losing data and close all open programs.
- The Memory Diagnostic results will be shown when your computer boots up again. You can check them at a later stage in Event Viewer.
10. Check if the BSOD shows again after the reboot
Checking RAM using the Windows Memory Diagnostic tool requires you to restart your computer. Use this as an opportunity to check if the BSOD has been fixed as a result of the BSOD troubleshooting you’ve been doing.
11. Reinstall Windows
If you’re still stuck with the blue screen of death, you have two more fixes. One of these is reinstalling Windows. This is especially helpful when you’ve encountered the BSOD after installing a new Windows update.
Important
For this step, you’ll need an external storage device—like a USB disk, external hard drive, or SD card—with at least 8 GB of space. Ensure the storage device is empty, as any data on it will be deleted during the Windows installation. Additionally, you must have a secure internet connection.
Here’s how to reinstall Windows 10 and 11:
To create the installation media on Windows 10 or 11:
- Start by backing up important files on OneDrive or an external storage device (note that it can’t be the same one you’ll download the Windows 11 installation media to).
- Download the Windows 11 installation media (click the Download Now button) or the Windows 10 installation media on your chosen external storage.
- Open the installation media on your desktop when the download is complete and click Yes to allow the app to make changes to your device.
- Accept the license terms and agreements on the Windows 10 or 11 Setup guide.
- Choose Create installation media (USB flash drive, DVD, or ISO file) for another PC and click Next.
- Now pick a language, edition, and architecture (64-bit or 32-bit), and click Next again.
- Choose a USB flash drive and hit Next.
- Follow the prompts to create the installation media. When you’re done, hit Finish.
To reinstall Windows 10 or 11 using the installation media you’ve just created:
- Connect the installation media you’ve just created to your Windows computer.
- Open File Explorer and choose the drive that contains the installation media.
- Double-click setup.exe in the drive's root directory. You may be asked to allow the app to make changes to your computer. If so, click Yes.
- Now determine what to keep by clicking on Change. Choose one of the following options, followed by Next:
- Keep personal files and apps to preserve your apps, personal data, and settings.
- Keep personal files only to preserve your settings and personal data and settings. However, your apps will be deleted.
- Keep nothing to delete all your apps, settings, and personal data. (Ensure you back up your files first if you pick this option, as a Windows 10 reinstallation can’t be undone.)
- Complete the installation process by clicking on Install.
IT expert warns you
Rolling back a driver update on Windows 11 will require having a Virtual Machine. It is recommended you do not do it unless you have the necessary experience. Hire an IT expert to roll back your update, or contact Clario AntiSpy IT support to guide you through the process.
12. Upgrade hardware
As most BSOD cases can be attributed to hardware issues, upgrading your hardware could be your best bet for getting rid of the STOP error. This isn’t the cheapest option, but it’s one of the most effective computer hacks against performance issues.
How to protect your PC from the blue screen of death
How to protect your Windows device from the blue screen of death:
- Create backups for important files to prevent data loss.
- Keep your PC up to date with the latest version.
- Protect yourself with antivirus software to prevent malware threats and viruses.
- Install automatic cleaning software on your PC. This helps keep your computer optimized.
We’ve established the causes and solutions to fix the blue screen of death. Now, it’s time to learn how to protect your device from it.
1. Create backups for important files
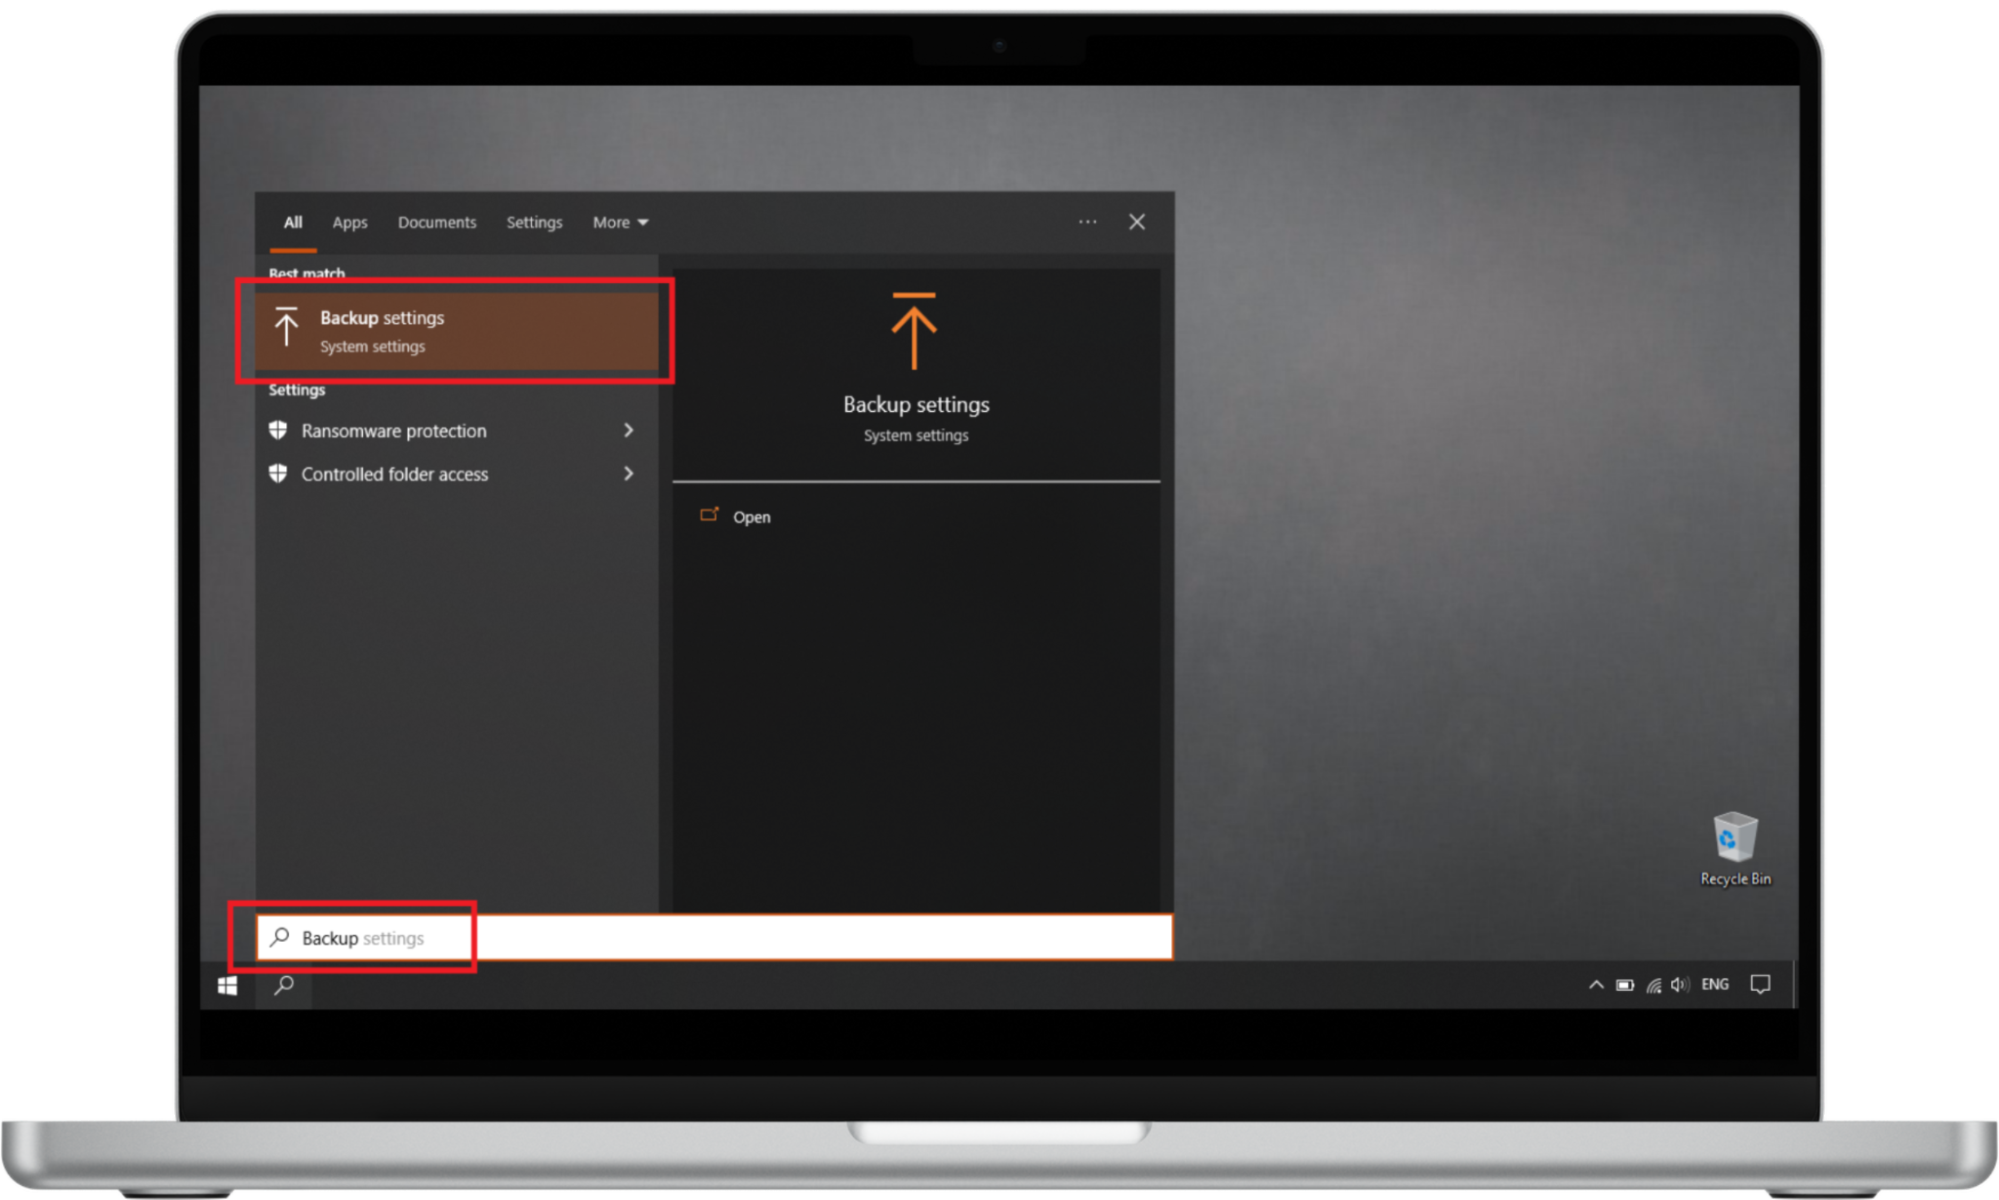
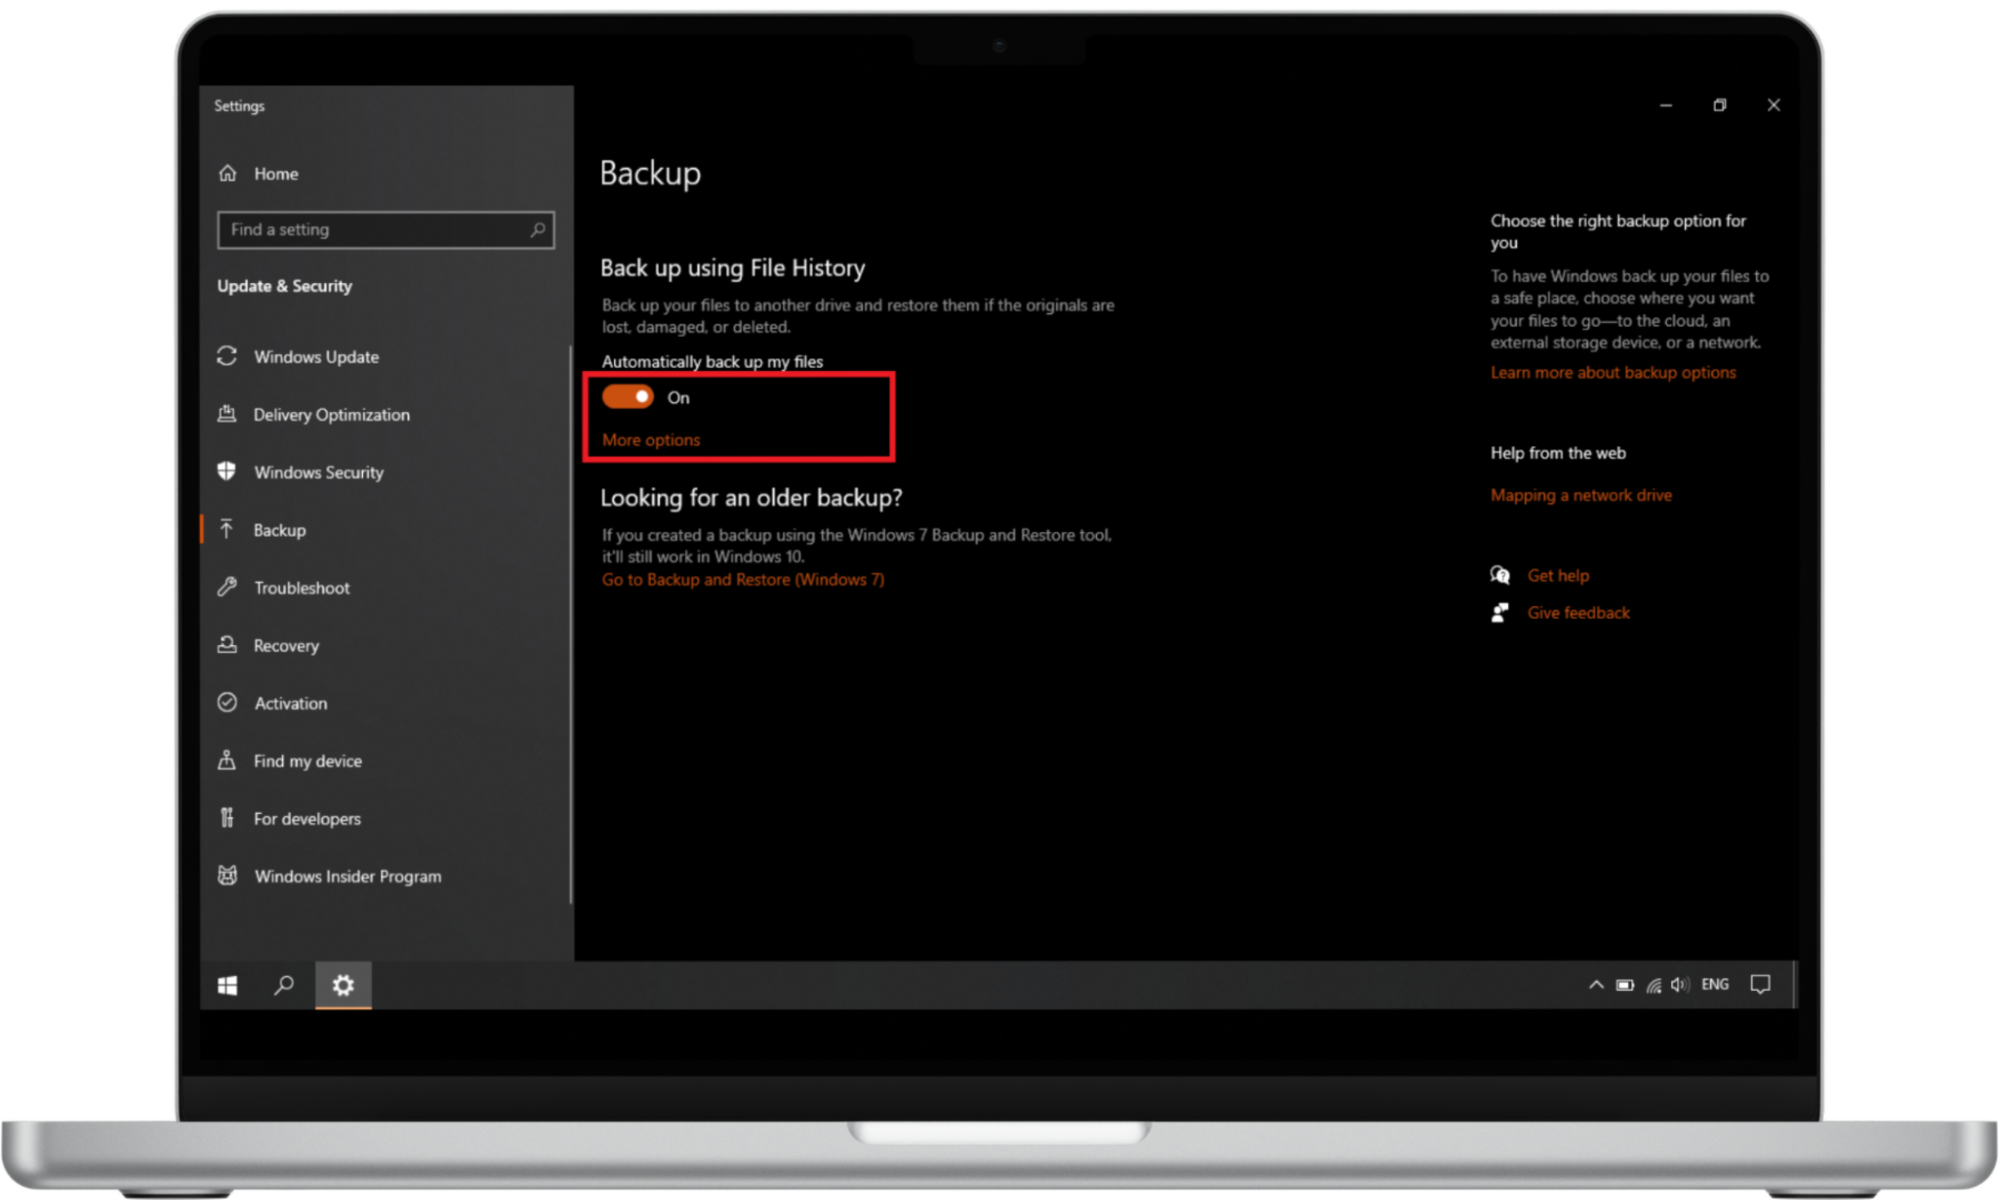
To create backups (example for Windows 10):
- If you have any programs open, you’ll have to close them.
- In the search bar, type backup, and click Backup Settings.
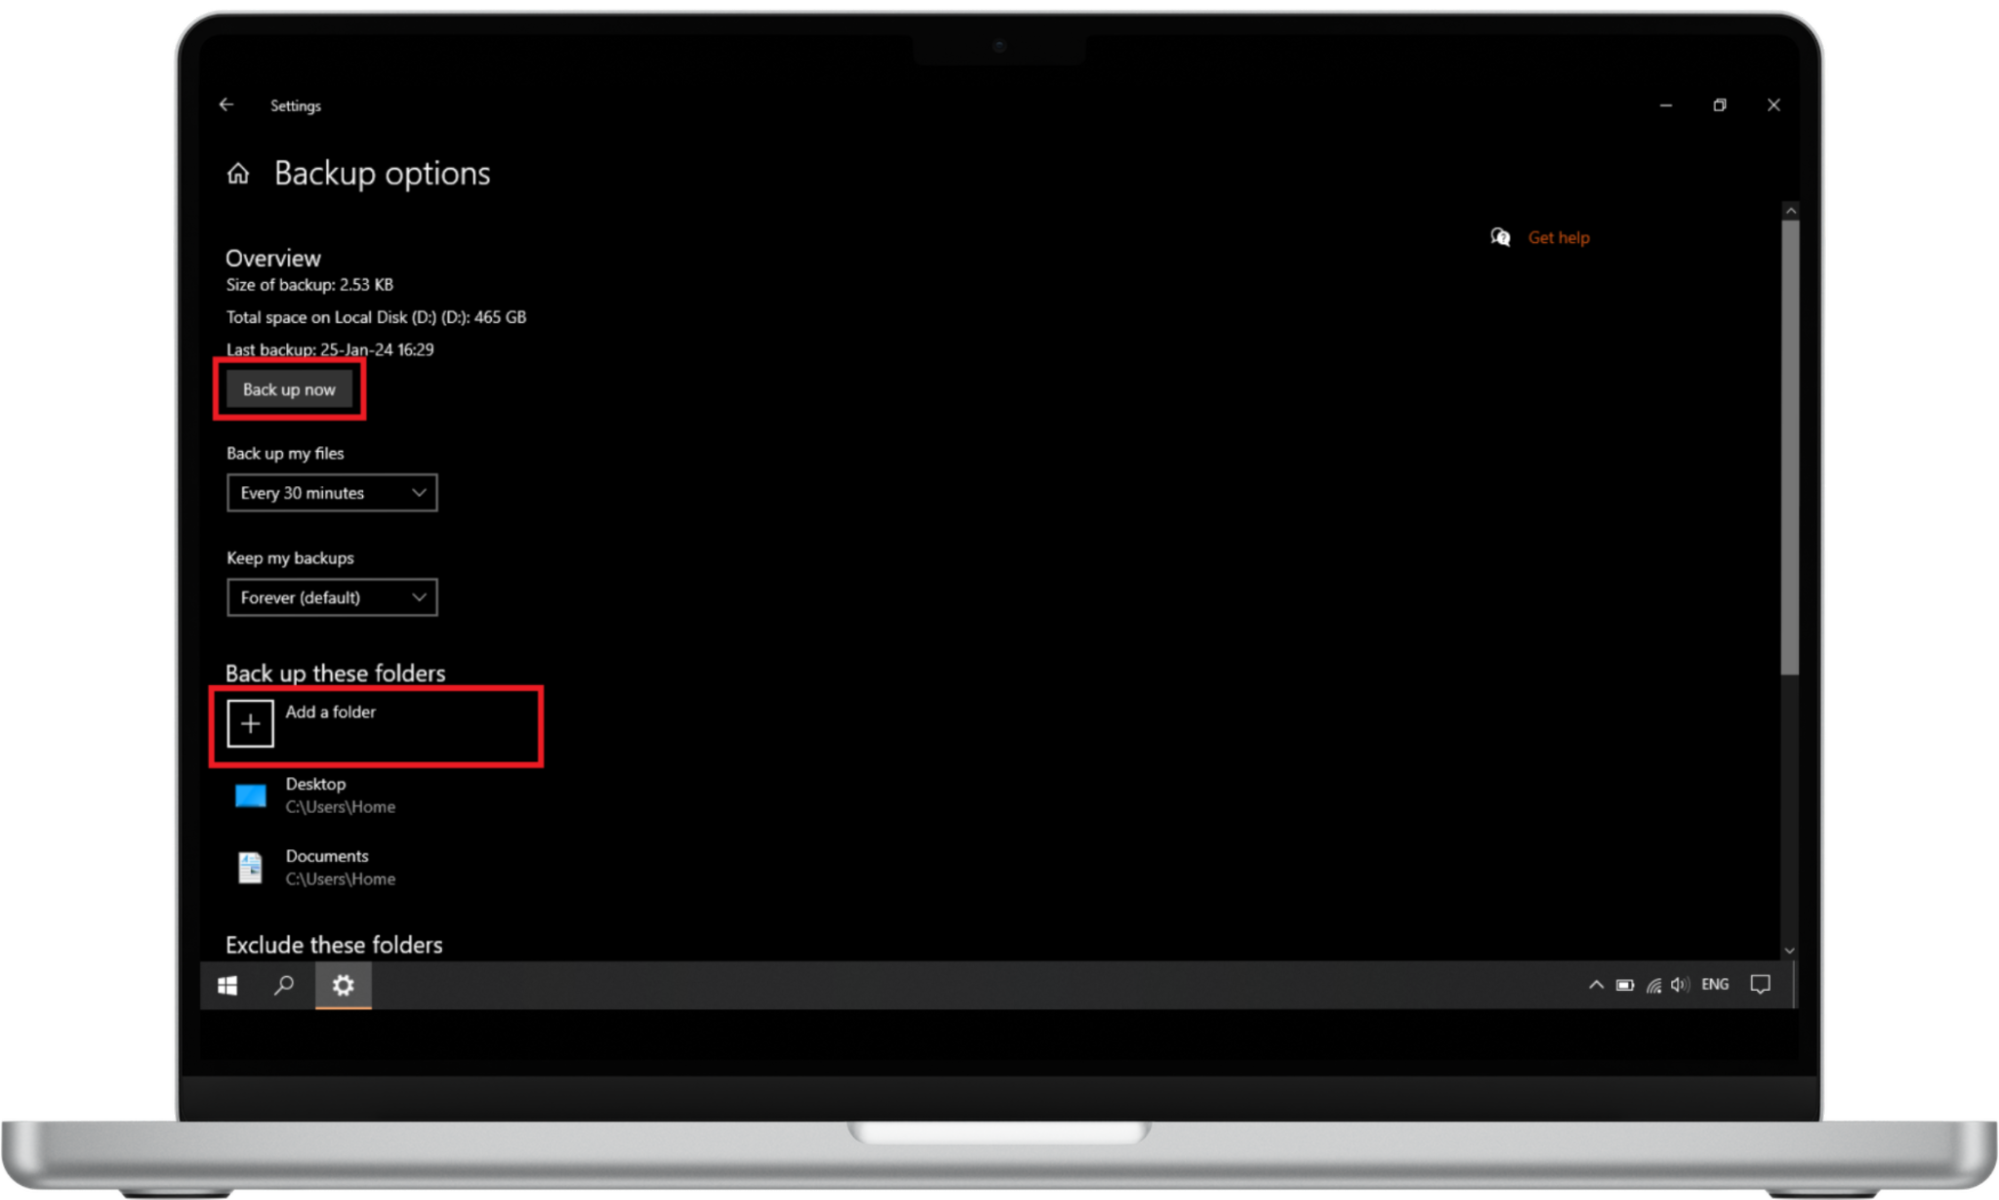
- In the Backup Settings window, switch to On in the Automatically back up my files section, and click on More options.
- Add needed folders to be saved in the Back up these folders section and click on Back up now in the Overview section. Wait until the backup is finished. The Last backup date will be changed after the backup is completed.
2. Keep your PC up to date
Keeping Windows updated to the latest version will keep it working optimally and save you a lot of headaches. That’s because it helps Windows maintain the security of your device and implement necessary features. More importantly, it’ll help you avoid errors that can cause you to see the blue screen of death.
3. Protect yourself with antivirus software
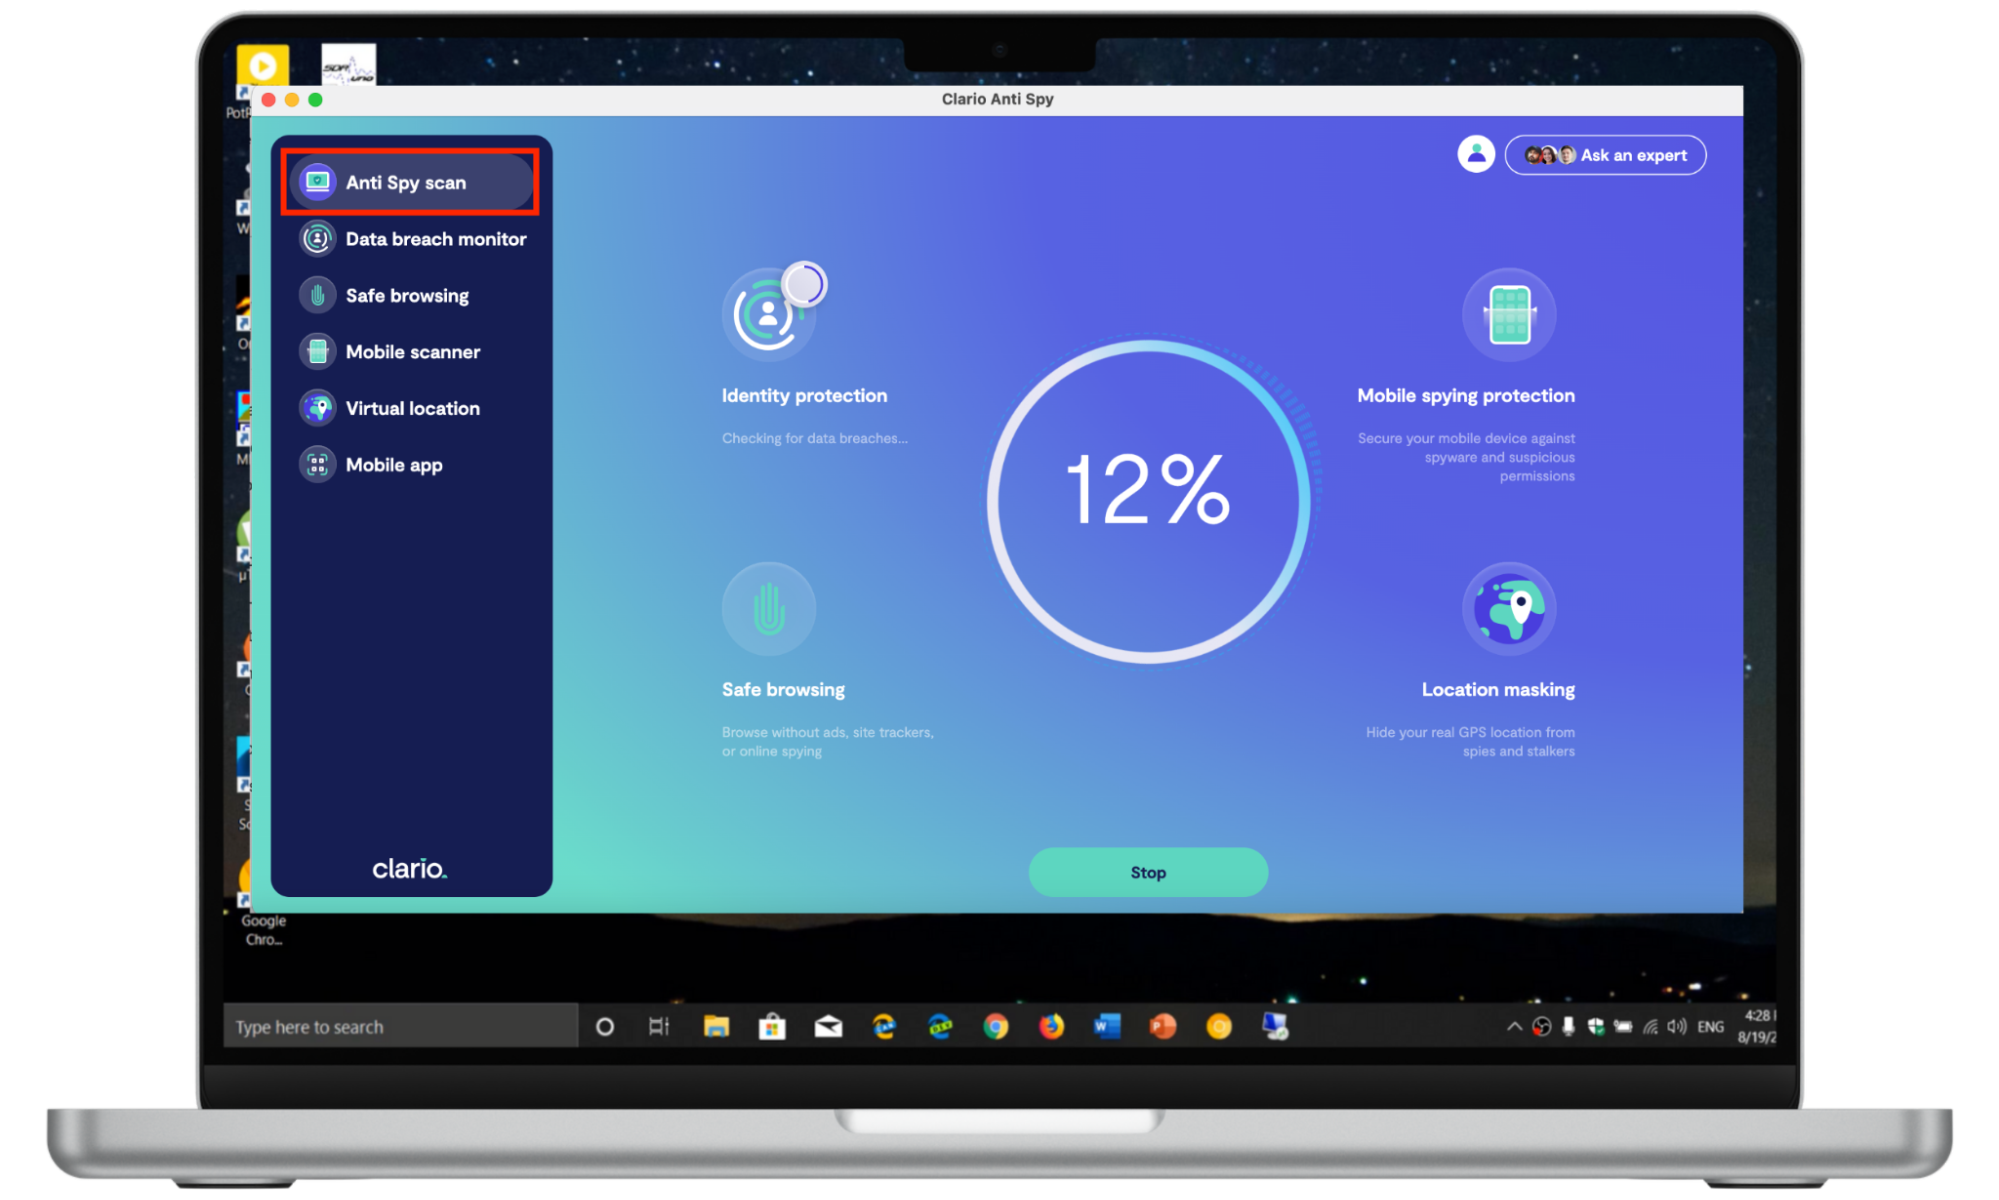
As a computer owner, you should prioritize computer virus removal to protect your device. Install antivirus software that is constantly maintained by its developers to avoid attracting viruses and malware, which would be counterproductive and detrimental to your privacy and security. Use Clario AntiSpy’s Anti Spy scan tool to keep your Windows device free of viruses and malware. Here’s how:
- Download Clario AntiSpy on your Windows PC, get a subscription, and set up an account.
- Click on Anti Spy scan in the sidebar, followed by the Start Scan button at the bottom of the window.
- Follow the progress of Clario AntiSpy’s Anti Spy scan on the screen. Clario AntiSpy will let you know if it finds any threats. If it does, follow the on-screen prompts to eliminate them.
4. Install automatic cleaning for your PC
Keeping up with your computer’s maintenance is ideal, but not always realistic. Between work and your daily demands, it’s easy to forget to clean your computer for weeks, sometimes months, until its performance slows down. Avoid this by using cleaning software, which automates the process to ensure your PC stays optimized.
Conclusion
The blue screen of death is a frustrating thing to experience on your PC, especially if you aren’t used to it. However, it’s common, and a sign that something is wrong with your hardware or software. Regardless, there are countless ways to fix it. Use the tips in our article to protect your computer from the dreaded BSOD and fix it when it appears.
Clario AntiSpy’s Spyware scan is a quick and efficient tool that monitors your PC for spying threats. The idea is to give you a clear picture of your device’s vulnerability to spying. Use it to quickly identify and eliminate any threats present on your PC that can cause the BSOD to appear.


